You just finished recording a ten-minute walkthrough on your Chromebook. You explained every step perfectly, your pacing was great, and you did not stumble over your words once.
You hit the stop button, click play to review your video, and... silence. Your masterpiece is completely muted.
This is a frustrating reality for millions of students, teachers, and everyday Chromebook users. While Google built a fantastic, lightweight screen recorder directly into ChromeOS, the audio settings are practically hidden. By default, the tool assumes you only want to record a silent video.
If you are tired of recording silent videos and want to know how to capture your voice, your computer's audio, and your screen all at once, here is the complete guide to mastering the Chromebook screen recorder.
How to Turn On the Hidden Audio Settings
You do not need to download any sketchy third-party apps or heavy Chrome extensions to capture audio. The tool you need is already on your computer; you just have to tell it to listen.
Here is the step-by-step process:
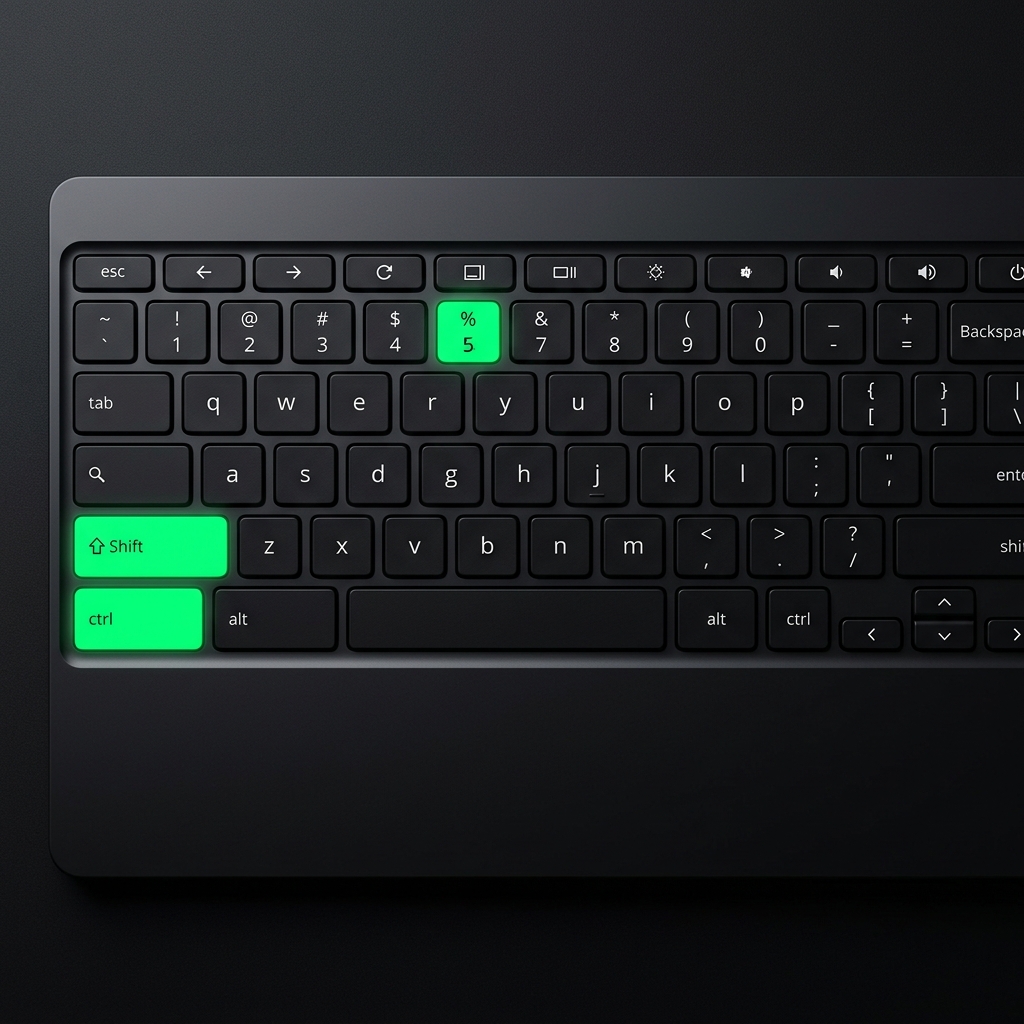
- Open the Screen Capture Tool: Press the Shift + Ctrl + Show Windows keys all at the same time. (The "Show Windows" key looks like a rectangle with two lines next to it, usually located right above the number 6). Note: If your newer Chromebook has a dedicated Camera icon key, simply press that!
- Select Video Mode: At the bottom of your screen, a menu will pop up. By default, it is set to take a photo screenshot. Click the Screen Record icon (it looks like a video camera).
- Open Settings: Before you click the screen to start recording, look for the small Settings gear icon on that bottom menu and click it.
- Choose Your Audio: Under the audio section, you will see three options. You must select one of these, or your video will be silent:
- Microphone: Select this if you only want to record your own voice speaking into the room.
- Device Audio: Select this if you want to record the sounds happening inside your computer (like a YouTube video playing or game sounds).
- Device Audio and Microphone: Select this to capture both your voice and the computer's sound at the exact same time.
Once you have made your selection, click anywhere on the screen to begin your fully narrated recording!
The "Raw Video" Problem for Creators
The built-in ChromeOS recorder is perfect for submitting a quick homework assignment or sending your IT team a computer bug. It is fast, free, and gets the point across.
But what if you are trying to build an audience on YouTube? What if you are an educator trying to sell digital courses, or a developer trying to show off a new app?
If you are using the native Chromebook tool for professional content, you will quickly run into three massive visual problems:
- Microscopic Text: The native tool captures your entire wide monitor. When your viewers watch that video on their mobile phones, the text is completely unreadable.
- Visual Anxiety: It captures every single shaky, rapid movement of your mouse, making your presentation look rushed and chaotic.
- Cluttered Environments: It forces you to show your browser tabs, your bookmarks bar, and your computer taskbar, instantly lowering the perceived quality of your video.
The Professional Creator's Upgrade
While a Chromebook is a fantastic, lightweight tool for everyday browsing and quick tasks, creators who want to produce viral, high-retention content eventually need a dedicated presentation studio.
You cannot expect a basic, built-in tool to give you the polished, cinematic look that modern viewers demand.
If you are ready to graduate from basic, raw recordings and want to create flawless video tutorials without spending hours in a video editing timeline, it is time to look at professional alternatives.
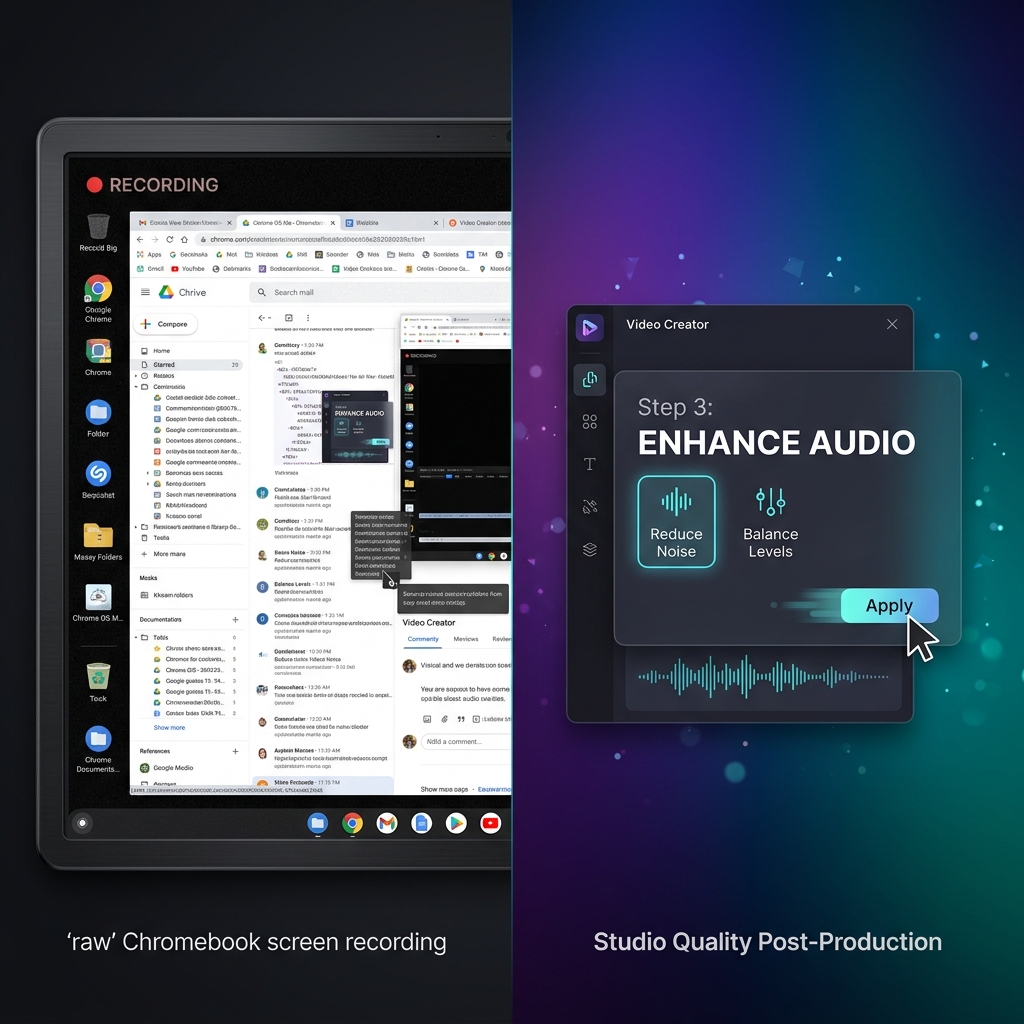
A common upgrade path for Chromebook educators and creators who outgrow the native tool is to record on a paired Mac or Windows machine instead—where a polished recorder like Cubix Capture can handle three things ChromeOS can't: zooming on the active region of your software for legible mobile playback, smoothing erratic cursor motion, and isolating a single window on a clean background instead of your tabs and bookmarks bar.
That keeps the Chromebook for what it's great at (lightweight authoring, quick walkthroughs, classroom assignments) and uses a desktop recorder for the polished, customer-facing or YouTube-bound version.
Stop Settling for Silent, Boring Videos
You have valuable knowledge to share, and you deserve a workflow that makes your content look and sound its absolute best.
Now that you know how to unlock the hidden audio features on your Chromebook, you will never have to re-record a silent tutorial again. When you outgrow the native tool, your next stop is Cubix Capture.
Related reading: