Here is the good news before you spend a cent: your Mac can already record video of its own screen, and it can do it well. Apple ships two free recorders inside macOS, and most people never realise the second one exists. You do not need a download, an account, or a trial that expires in seven days.
This guide walks through both free methods step by step, then covers the three things every first-timer trips over — where the file goes, how to trim it, and why your Mac refuses to record its own sound.
Method 1: The Screenshot Toolbar (the fast way)
This is the one to memorise. It opens in under a second and never gets in your way.
- Press Command + Shift + 5 together. A floating toolbar slides up from the bottom of the screen.
- Pick one of the two video icons: Record Entire Screen, or Record Selected Portion — which lets you drag a box around just the window you care about and leave your messy desktop out of frame.
- Click Options. Under Microphone, choose your built-in mic if you want narration. While you are there, set Save to (Desktop by default) and turn on a countdown timer if you want a moment to get ready.
- Click Record. To finish, click the small stop square in the menu bar at the top-right of your screen, or press Command + Control + Esc.
A thumbnail drops into the bottom corner when you stop — click it right away and you can trim the start and end before the file even saves.
Method 2: QuickTime Player (the way most people miss)
QuickTime is sitting in your Applications folder right now, and it can record the screen too. It is handy when you want the recording controls inside a real app window rather than a floating strip.
- Open QuickTime Player (Spotlight: Command + Space, type "QuickTime").
- In the menu bar choose File → New Screen Recording.
- The same control toolbar appears. Pick your area and mic, then record.
QuickTime's bonus trick: after recording, go to Edit → Trim to clean up the ends, or File → Export As to drop the resolution and shrink the file before you send it.
Where do my recordings actually go?
By default, both methods save a .mov file to your Desktop, named with the date and time. To change that, open the Command + Shift + 5 toolbar, click Options, and pick a different folder under Save to — a dedicated "Recordings" folder keeps your desktop sane.
The honest catch: internal audio is not free
This is where the built-in tools quietly let people down. macOS lets you record your microphone, but it blocks recorders from capturing the sound playing inside your Mac — the audio from a YouTube video, a Zoom call, or a game. Apple walls that off at the system level. The free workarounds involve installing a virtual audio driver and routing your sound through it, which is fiddly and easy to get wrong. If your tutorial depends on system audio, know that going in.
When free recordings start to feel "raw"
The built-in recorders are perfect for a quick clip. The moment you are making something other people are meant to learn from, two weaknesses show up. Retina displays are so sharp that a full-screen recording looks tiny once it is played back on a laptop or phone, and the natural twitch of a trackpad turns your cursor into a distracting blur.
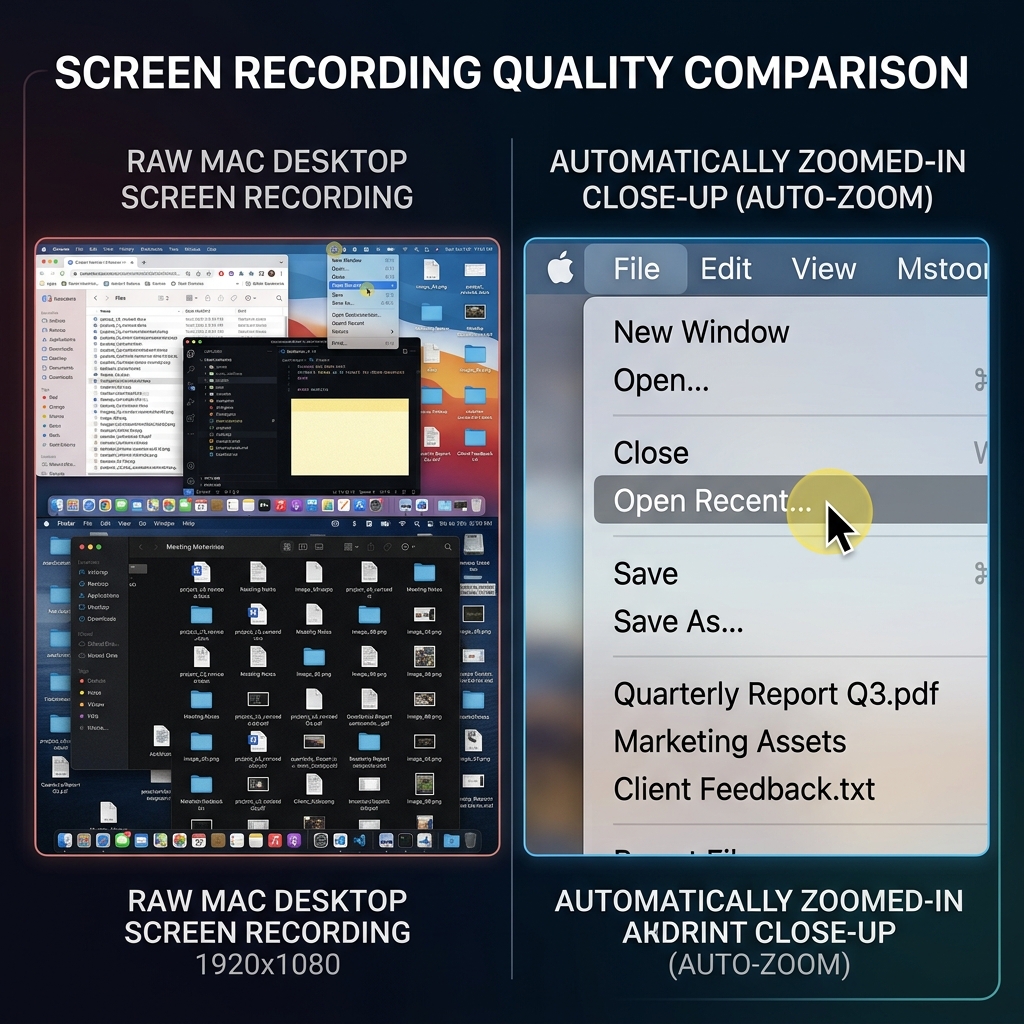
The usual fix is to drag the raw .mov into an editor and manually add zooms and steady the cursor — hours of work. If you would rather skip that step entirely, Cubix Capture is free to start and does the cleanup while you record: it zooms in on whatever you click so the text stays readable, smooths the cursor path, and can tidy up your webcam background. You stop recording and the polish is already there.
Either way, the takeaway is simple: recording video on a Mac costs nothing, and you have two solid free tools built right in. Use them for everyday clips, and reach for an automatic recorder only when "watchable" matters as much as "recorded."