You are trying to walk a coworker through a new software platform, show your IT department exactly how an app is crashing, or save a live webinar that you know you won't have time to finish watching.
In the past, you would have to type out a massive, confusing email filled with bullet points and static screenshots, or download a sketchy third-party screen recorder with a giant watermark.
Today, macOS has one of the most powerful, elegant screen recording engines built directly into the operating system. Whether you want to capture your entire monitor, a tiny specific window, or record your own voice over the video, you can do it all in seconds. Here is the definitive guide to screen recording on your Mac in 2026.
Method 1: The Master Shortcut (The Best Way)
The Shortcut: Command + Shift + 5
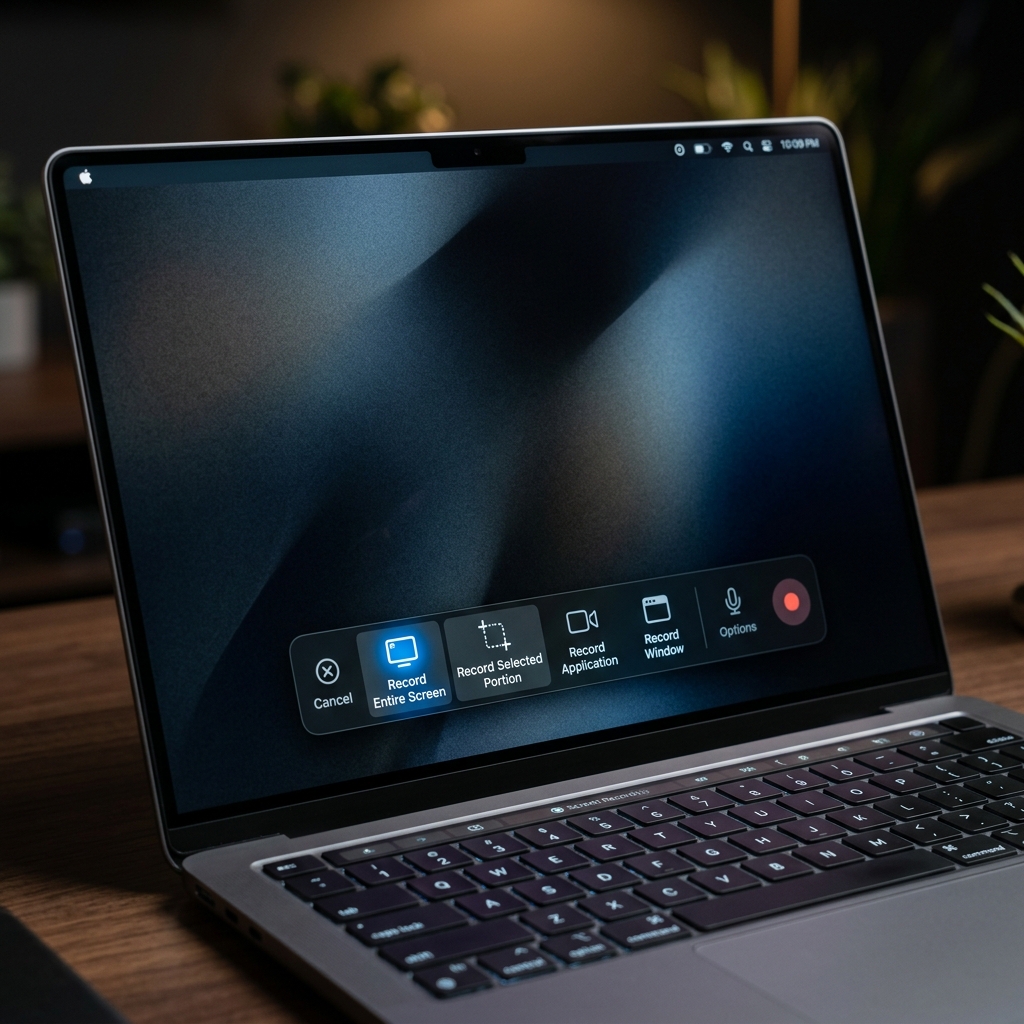
Apple centralized all of its screen capture and recording tools into one beautiful, floating master menu. If you only remember one thing from this guide, make it this keyboard combination.
How to do it:
- Press
Command + Shift + 5at the same time. - Your screen will slightly dim, and a sleek toolbar will appear at the bottom of your monitor.
- Look at the middle section of the toolbar. You have two video recording options:
- Record Entire Screen: (The icon looks like a solid desktop with a circle in the corner). Click this, then click anywhere on your screen to instantly start recording everything.
- Record Selected Portion: (The icon looks like a dashed box with a circle). Click this, and your mouse becomes a crosshair. Drag a box over the exact area of the screen you want to record, then click Record on the toolbar.
The "Options" Menu (Crucial Settings)
Before you hit record, click the Options button on that floating toolbar. This is where the real power lives:
- Microphone: By default, your Mac records video with no sound. If you want to narrate your video, select your MacBook Pro Microphone (or external mic) here.
- Save To: Choose exactly where the massive video file will land when you finish (Desktop, Documents, or directly into an email).
- Timer: Set a 5 or 10-second countdown so you have time to open the right windows before the recording actually starts.
- Show Mouse Clicks: Turn this on if you are making a tutorial. Every time you click your mouse, a black circle will pulse on the video, making it much easier for viewers to follow your actions.
The Most Important Step: How to Stop the Recording
This is the number one reason people panic when recording their Mac screen. The floating toolbar disappears while you are recording, leaving many users frantically mashing their keyboard trying to figure out how to make it stop.
You have three simple ways to stop a recording:
- The Menu Bar: Look at the very top right of your Mac's screen (next to your Wi-Fi and battery icons). You will see a small Stop icon (a square inside a circle). Click it once.
- The Shortcut: Press
Command + Control + Escto instantly stop the recording. - The Master Menu: Press
Command + Shift + 5again, and click the Stop button that appears on the toolbar.
(Once stopped, a thumbnail will briefly appear in the bottom right corner of your screen, and the .mov video file will automatically save to your designated folder).
Enjoying this read?
Get weekly insights on video editing, AI workflows, and creator growth straight to your inbox.
Method 2: QuickTime Player (The App Approach)
If you hate keyboard shortcuts and prefer launching actual applications, you can still use Apple's classic media player to trigger a screen recording.
How to do it:
- Open your Applications folder (or use Spotlight Search by pressing
Command + Space) and open QuickTime Player. - Look at the menu bar at the very top left of your screen and click File.
- Select New Screen Recording.
- Note: In modern versions of macOS, clicking this simply triggers the exact same
Command + Shift + 5floating toolbar mentioned in Method 1. But it is a great fallback if your keyboard is acting up.
The Elephant in the Room: Recording Internal Audio
There is one major limitation with Apple's native screen recorder: It does not easily record internal system audio. If you want to record a YouTube video, a Zoom meeting, or a video game with the actual high-quality sound coming from the computer (rather than the sound of your laptop speakers echoing back into your microphone), the native tool will not do it out of the box. Apple restricts this for copyright and privacy reasons.
The Workaround: To capture internal audio, you have to download a free, third-party "virtual audio cable" like BlackHole or Loopback. These tools trick your Mac into routing its speaker output directly into the screen recorder's microphone input.
Upgrade Your Video Presentations
Using Command + Shift + 5 is brilliant for capturing a quick, raw video to send to a coworker. But when you are dealing with professional, client-facing communication—like recording an onboarding tutorial, pitching a new software interface, or building a marketing demo—a raw, unedited screen recording feels amateurish.
If you find yourself recording your screen and then spending three hours in Premiere Pro or Final Cut trying to zoom in on your mouse clicks, cut out your mistakes, and make the video look presentable, you are wasting your valuable time.
When you are ready to graduate from raw recordings and start instantly generating breathtaking, auto-zoomed cinematic video presentations without ever touching a video editing timeline, explore the ultimate professional toolkit right here: Cubix Capture.
Don’t miss the next one.
Join our newsletter for exclusive tips, product updates, and the latest from the Cubix team.