There is a unique kind of frustration that sets in when you add a Display Capture source in OBS Studio, only to be greeted by a blank, completely black preview screen. Your audio meters are bouncing perfectly, and your microphone is working, but your desktop refuses to show a single pixel.
Because OBS Studio is built as a professional broadcasting ecosystem rather than a basic screen recorder, it doesn't just copy your screen frame. It hooks directly into your system's graphics core. When Display Capture outputs a black screen, it usually means your operating system’s graphics layers or hardware routing protocols are misaligned.
Here is the step-by-step diagnostic roadmap to fix your OBS Display Capture black screen on Windows and Mac instantly.
Step 1: Change the Capture Method (The 10-Second Fix)
If you are on Windows, OBS features multiple ways to pull display pixels. The default "Automatic" setting can sometimes lose its handshake with the Windows display manager.
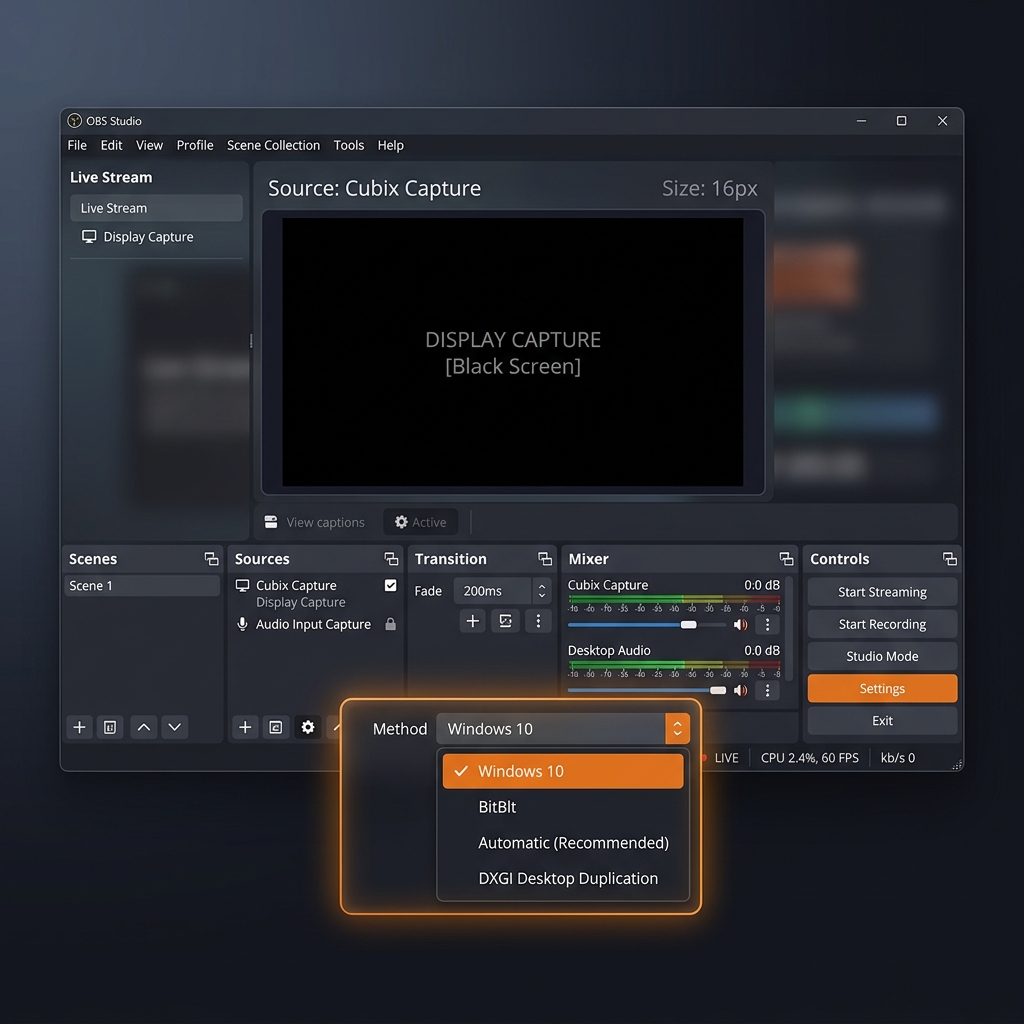
- Go to your Sources box at the bottom of OBS and double-click your Display Capture source.
- In the properties window that pops up, look for the Capture Method dropdown menu.
- Switch it from Automatic to Windows 10 (1903 and up).
- If your desktop background instantly appears in the preview pane, click OK. You're done!
Step 2: Fix the Dual-GPU Power Tug-of-War
If changing the capture method didn't work and you are using a laptop or a desktop with multiple graphics chips (an integrated Intel/AMD processor chip alongside a dedicated NVIDIA or AMD graphics card), your hardware is experiencing a routing conflict.
Windows tries to save power by running your basic desktop canvas on your low-power integrated chip, while forcing heavy applications (like games or video editors) onto your dedicated card. Because OBS defaults to your heavy dedicated graphics card, it cannot "see" your desktop layer sitting on the low-power chip, resulting in a black box.
-
Open Windows Graphics Preferences: Access your core OS display settings. Press the Windows Key, type Graphics settings into your search bar, and hit Enter.
-
Locate OBS Studio in the Directory: Find the OBS execution file. Scroll down the application list. If OBS Studio isn't there, click the Browse button and find its local installation path (the default Windows location is
C:\Program Files\obs-studio\bin\64bit\obs64.exe). -
Adjust the GPU Preference: Select the precise processing strategy. Click on OBS Studio in your application directory list and select Options.
-
Select Power Saving Mode: Lock in the desktop capture profile. To allow OBS to see your full desktop canvas, choose Power Saving (this forces OBS onto your integrated graphics chip to mirror the screen layer). Click Save, close OBS completely, and relaunch it.
Enjoying this read?
Get weekly insights on video editing, AI workflows, and creator growth straight to your inbox.
Step 3: Grant System Screen Recording Permissions (macOS)
If you are a Mac user encountering an OBS black screen, it is almost never a graphics card conflict. Apple treats full screen recording as a critical user privacy issue. If you haven't explicitly whitelisted the app in your security panel, macOS will output an empty black window to protect your data display.
- Click the Apple logo in the top-left menu bar and select System Settings.
- Navigate to Privacy & Security in the left sidebar, scroll down, and click Screen & System Audio Recording.
- Find OBS in the application array. If the toggle is switched off, click to switch it On.
- Enter your Mac password when prompted, then click Quit & Reopen for the new security architecture to take effect.
Step 4: Turn Off Hardware Acceleration for DRM Video
If your Display Capture mirrors your desktop, files, and standard apps perfectly, but drops into a dark void the exact moment you open a web browser tab to watch a video (like Netflix, YouTube, or Prime Video), you are hitting Digital Rights Management (DRM) blocks. Browsers use graphics acceleration to actively black out screen recorders to prevent unauthorized media duplication.
- The Fix: Open your browser's settings menu (Chrome, Edge, or Brave), type Hardware Acceleration into the internal settings search bar, and toggle Use graphics acceleration when available to Off.
- Relaunch your browser. Your browser window will now be fully visible to OBS. Just remember to flip this setting back on when you're finished recording, as running your browser without hardware acceleration forces your main CPU to do all the visual work, which can make web scrolling feel sluggish over time.
Tired of Troubleshooting? Shift to Zero-Edit Automation
OBS Studio is an incredible open-source utility for live broadcasters who need advanced multi-track audio routing and technical streaming encoders. However, constantly modifying system GPU priorities, managing capture profiles, and dodging black screens can completely kill your creative momentum.
If your primary goal is simply producing crisp software tutorials, web walkthroughs, or clean product demonstrations without playing IT support technician every week, it is time to move your workflow to Cubix Capture.
Instead of acting like a rigid broadcast console that breaks under basic hardware shifts, Cubix Capture uses a modernized recording engine designed to style and reframe your videos while you speak:
- Zero-Configuration Window Isolation: It completely eliminates the multi-GPU tug-of-war. You simply select the specific application window or browser tab you want to teach, and Cubix Capture isolates and hooks into that frame perfectly with zero black screen errors.
- Algorithmic Focus Zooms: Because over half of your audience watches videos on smartphones, full-desktop captures make user interface text look microscopic. Cubix Capture automatically tracks your cursor targets and smoothly glides the camera inward to magnify dropdown menus, text blocks, and settings panels dynamically.
- AI Cursor Path Smoothing: It catches naturally jerky micro-movements from your physical trackpad or mouse and smooths them into an elegant, cinematic glide.
If you are setting up an elaborate live stream with multiple camera feeds, adjusting your capture method inside OBS or forcing Power Saving mode in Windows will get your display running again. But if you want to protect your schedule and output polished, mobile-optimized tutorials the exact millisecond you click stop recording, moving your creator setup to a smart tool like Cubix Capture handles the entire production pipeline for you seamlessly.
Don’t miss the next one.
Join our newsletter for exclusive tips, product updates, and the latest from the Cubix team.