Most people go looking for "clipboard history on Mac" right after a specific kind of annoyance. You're filling in a form, you copy your account number, then realize you also need the routing number and copy that too. First field pastes fine. Second field — nothing useful, because copying the routing number wiped the account number. So you trek back to the source and re-copy. Multiply that by every multi-field form, every code, every two-things-at-once task, and you start typing "how to enable clipboard history Mac" into Google.
Good news and bad news. The feature absolutely exists and is easy to get. It just isn't where you'd expect to find it.

What "Clipboard History" Means
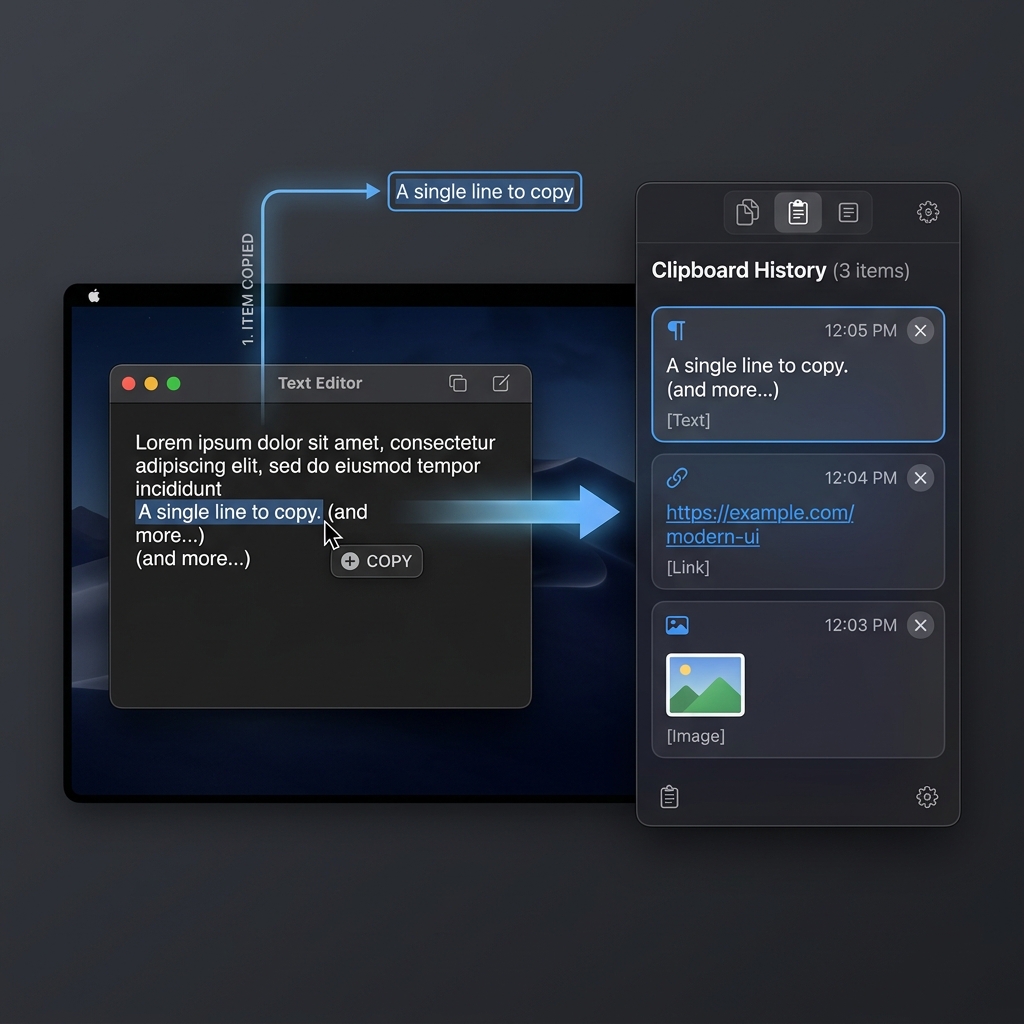
By default your Mac keeps only your most recent copy. Clipboard history changes that to a running, scrollable list of everything you've copied — so a shortcut shows your last 5, 50, or 500 items and you paste any one of them, including something from an hour ago. Same Command-C you already use; the difference is that nothing gets thrown away.
Where the Toggle Is (And Why You Won't Find It)
If you've used Windows, you know it has this built in: Windows + V opens a clipboard history panel. So Mac users naturally open System Settings and start hunting for the equivalent switch.
Here's the part worth saving you time on: macOS has no built-in clipboard history toggle. There is no checkbox in System Settings, no hidden keyboard shortcut, no Terminal flag that turns it on. The system clipboard is hardwired to a single item.
A common point of confusion is Universal Clipboard — Apple's feature that lets you copy on your iPhone and paste on your Mac (and vice versa). It's genuinely useful, but it does not add history. It still only carries one item between devices. (If cross-device is what you actually want, see how to share your clipboard between Mac and iPhone.)
So the honest answer to "how do I enable it" is: you add a small app that provides it. That's not a workaround — on macOS it's the only path, and it takes about a minute.
Enabling It in About a Minute
- Install a clipboard manager. This is the app that supplies the history macOS lacks. It runs in the menu bar and starts recording copies immediately.
- Pick your shortcut. Most managers default to a key combo that opens the history panel — the Mac equivalent of Windows + V. Set it to something comfortable.
- Use it like normal. Keep copying the way you always have. Now, instead of replacing the last item, each copy stacks into the list. Open the panel, click any past entry, and it pastes.
That's the whole setup. From then on, "I copied two things and lost the first" simply stops happening.
The Free App That Adds It
Since macOS makes you supply this yourself, there's no reason to pay a subscription for it. Cubix Clip is a free clipboard manager for Mac that adds exactly the history feature Apple left out: it records every copy — text, links, images, files — into an ordered list and brings it up with a shortcut so you can paste anything you've copied recently.
Download it, let it sit in your menu bar, and your Mac effectively gains the Windows + V feature it never had. Copy your account number, your routing number, and three links in a row, and all five are waiting for you.
New to the whole concept? What a clipboard manager is and why Mac users need one covers the basics first.
The Takeaway
You can't toggle clipboard history on in macOS settings — but you can add it in a minute and never think about the one-item limit again. Install Cubix Clip, set your shortcut, and the next time a form asks for two numbers at once, both of them will be right there.