You invested in a beautiful 4K external monitor and a powerful MacBook. You want your software tutorials, coding sessions, and design handoffs to look incredibly crisp.
You open your screen recording software, select your 4K display, and hit record. But when you watch the video back, your heart sinks. The mouse cursor stutters across the screen. The video freezes for seconds at a time. It looks like a choppy stop-motion film rather than a smooth, professional presentation.
Recording a 4K screen is one of the most stressful tasks you can ask a computer to do. If you do not have your software configured perfectly, your MacBook will overheat, drop frames, and ruin your recording.
If you want to capture every single pixel of your high-resolution display without your computer grinding to a halt, here is exactly why lag happens, how to fix your settings, and the best way to record 4K-quality tutorials effortlessly.
Why Does 4K Recording Cause Lag?
To understand how to fix the lag, you have to understand what your MacBook is actually doing when you hit record.
A standard 1080p screen contains about 2 million pixels. A 4K screen contains over 8 million pixels. When you record a 4K screen at 60 frames per second, your computer is being forced to process, compress, and save nearly 500 million pixels every single second.
If your screen recording software is using "Software Encoding," it forces your MacBook's main processor (CPU) to do all this heavy lifting. The CPU quickly gets overwhelmed, overheats, and starts dropping frames to survive. This dropped data is what causes the visual lag and stuttering.
Method 1: The QuickTime Player Solution (The Native Fix)
If you need to record your 4K screen right this second and don't want to download anything new, Apple’s built-in QuickTime Player is surprisingly efficient. Because Apple designed the software, it is highly optimized to use your Mac's internal hardware efficiently.
How to use it:
- Hit Command + Shift + 5 on your keyboard to open the native screenshot/recording toolbar.
- Select Record Entire Screen or Record Selected Portion.
- Click the Options menu and ensure your microphone is selected.
- Hit Record.
The Catch: QuickTime is great at preventing lag, but it creates absolutely massive file sizes. A five-minute 4K recording can easily eat up gigabytes of your hard drive space. Furthermore, it records a raw, static video with zero presentation polish.
Method 2: OBS Studio (The Power User Fix)
If you are using a third-party app like OBS Studio to record your 4K screen, it will almost always lag by default. You have to dive into the settings and change how the video is processed. You must switch from Software Encoding to Hardware Encoding.
Hardware encoding tells your MacBook to stop using the busy CPU and instead use a dedicated media processing chip designed specifically for video.
How to fix OBS lag:
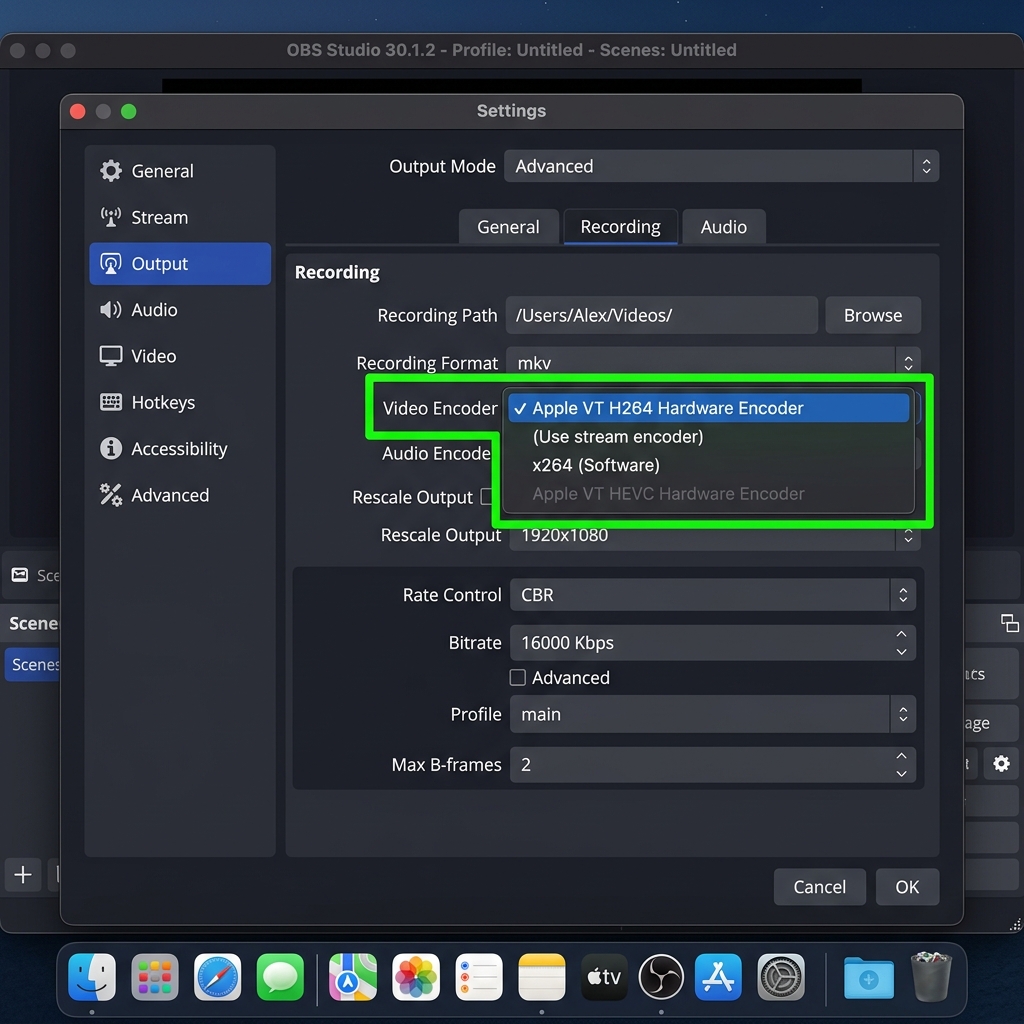
- Open OBS Studio and click on Settings.
- Navigate to the Output tab.
- Change the Output Mode from Simple to Advanced.
- Find the Video Encoder dropdown menu.
- Change it from
x264(Software) to Apple VT H264 Hardware Encoder (or HEVC). - Lower your Bitrate slightly (aim for 10,000 to 15,000 Kbps for screen recordings).
This instantly takes the stress off your MacBook and results in a buttery-smooth 4K recording.
The "4K Editing" Trap
So, you fixed the lag and successfully recorded a raw 4K video. Congratulations! But now you face a new nightmare: editing it.
Why do creators record in 4K? Usually, it is because they want the ability to zoom in on specific parts of their software during the editing process without the video getting blurry.
But dragging a massive 4K video file into Premiere Pro or Final Cut Pro will make your editing timeline lag just as badly as the recording process did. You will spend hours manually adding zoom keyframes, struggling with a sluggish timeline, and waiting an hour just for the video to export.
Recording raw 4K video to get manual zoom effects is an outdated, exhausting workflow.
The Ultimate Creator Solution: Work Smarter, Not Harder
If your goal is to create a crystal-clear tutorial where your viewers can read every line of code or see every button you click, you don't need to brute-force a massive 4K file and spend hours editing it. You just need a smarter screen recorder.
This is exactly why a growing share of Mac creators are skipping raw 4K recording entirely and using a recorder built around the post-zoom workflow, like Cubix Capture.
The idea is simple: stop forcing your CPU to push 8 million pixels per frame just so you can zoom in later. Instead, the recorder tracks your clicks and keystrokes during capture and tightens the frame in real time, so you get the visual outcome of "4K with manual zooms" without any of the encoding load:
- The active region of your software stays large and readable on phones, without you ever recording a full 8MP canvas.
- Mouse motion is smoothed during capture, removing the second reason most creators record at 4K (so they have visual headroom for keyframed cursor effects).
- The output file is a normal-sized MP4 that uploads fast, embeds cleanly, and doesn't choke an editing timeline if you do want to trim it later.
On Apple silicon Macs, this also matters thermally: capturing a tighter frame avoids the sustained 4K-at-60 thermal load that throttles fan-cooled MacBooks during long recordings.
Stop Fighting Your Hardware
You bought a powerful MacBook to help you create amazing things, not to fight with laggy video files and frustrating editing timelines.
Switching OBS to the Apple VT H264 hardware encoder is the right fix when you genuinely need a raw 4K master. For the more common case—software tutorials, demos, lessons—shifting to a click-following capture workflow with Cubix Capture sidesteps the 4K trap entirely.
Related reading: