You record a great presentation, save a family clip, or finish a screen recording — and your Mac throws up the "Your startup disk is almost full" warning. You try to email the video to a colleague and it bounces. You try to upload it and it stalls at 30% for an hour.
The instinct is to search the internet for a "free video compressor." That search almost always lands on a site that wants you to upload your private footage to an unknown server, install a profile, or download a binary you cannot verify.
You do not need any of that. macOS has four built-in ways to reduce video file size — none of them require a download, none upload your video anywhere, and three of them take less than 30 seconds.
Here is every native path, what each one is best at, and the Apple-silicon HEVC trick that can cut file size in half with no visible quality loss.
Method 1: QuickTime Player Export (The Default for Most People)
QuickTime is not just a video player — it is also a one-click resolution-based compressor. It is the safest path because it is signed by Apple and runs entirely on your machine.
- Open the Video: Double-click your large video file. By default, it should open in QuickTime Player. If it opens in another app, right-click the file, choose Open With, and select QuickTime Player.
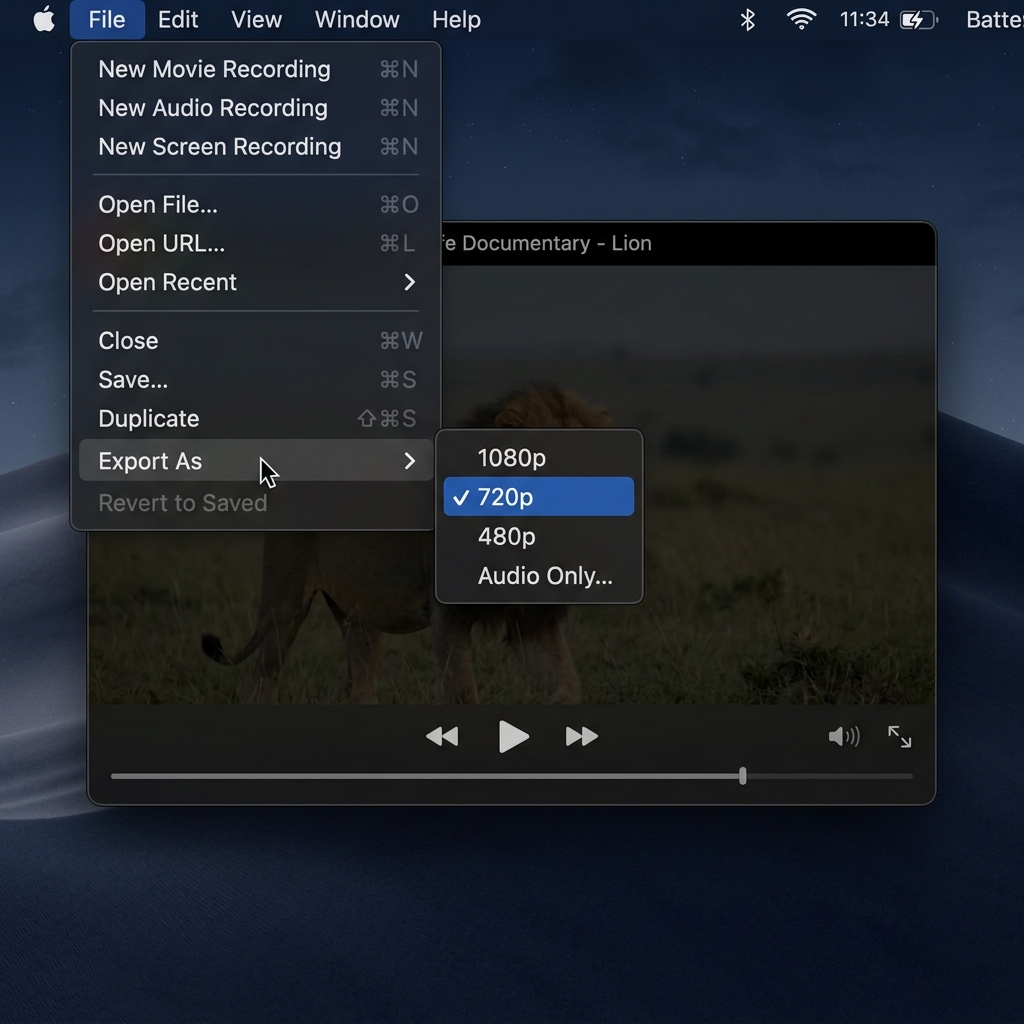
- Go to the Export Menu: In the macOS menu bar at the top of the screen, click File.
- Choose Export As: Hover over the Export As option in the dropdown.
- Pick a Lower Resolution: You will see 4K, 1080p, 720p, and 480p.
- Save: Give the new file a name and click Save.
If the original is 4K, dropping to 1080p typically cuts the file by 60–70% and is invisible on any phone screen. Dropping again to 720p cuts another ~50% and is still fine for email or messaging apps.
Method 2: Finder Quick Actions (The 10-Second Path)
If you want to compress a video without even opening an app, the Finder has a hidden encoder built right in. This is the fastest path when you have a folder full of clips to process.
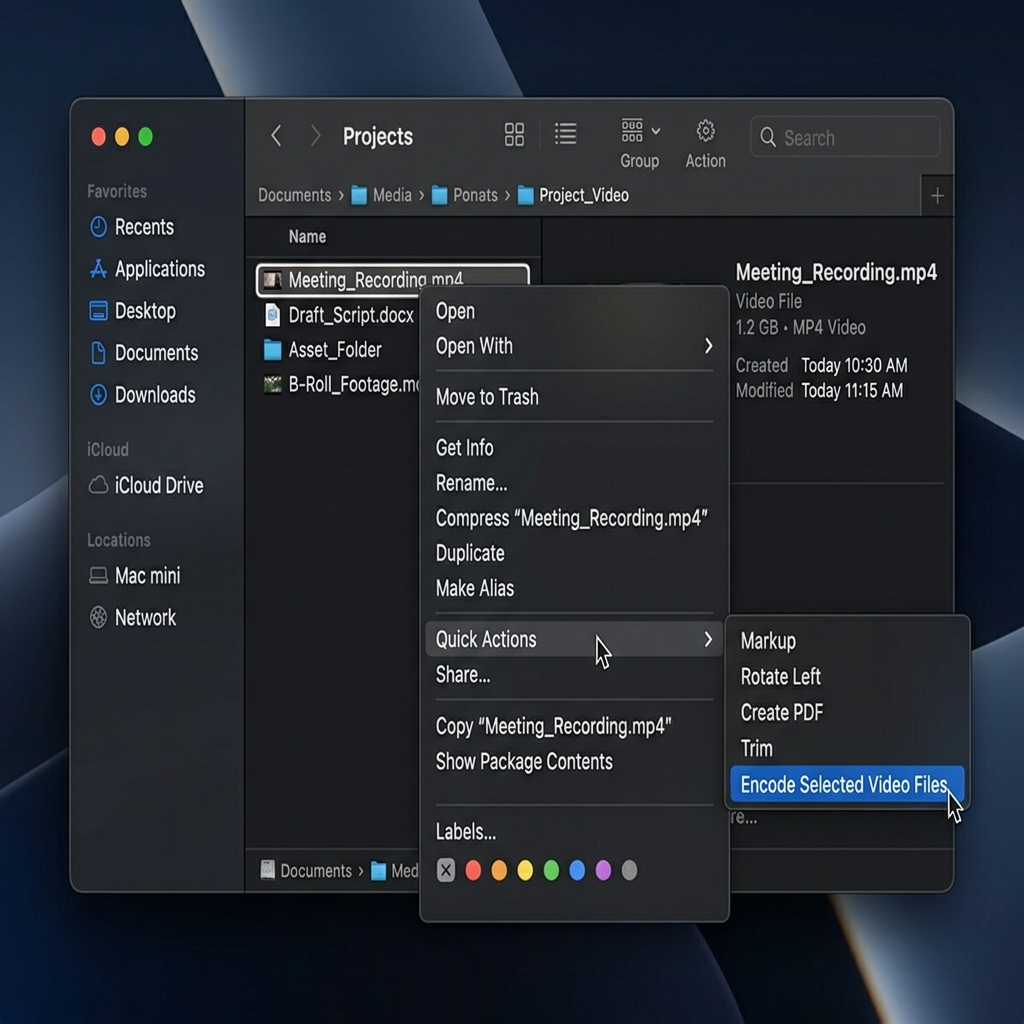
- Find the File: Locate the heavy video in Finder or on the desktop.
- Right-Click: Two-finger click (or Control-click) on the video.
- Hover over Quick Actions: On older macOS versions this is labelled Services.
- Select Encode Selected Video Files: A small settings sheet appears.
- Choose Settings:
- Change the Setting dropdown to 720p (or 1080p if quality matters more than size).
- Tick the HEVC checkbox if the recipient is on an Apple device (HEVC files are ~40% smaller than H.264 at the same quality). Leave HEVC off if the file is going to a Windows or Android user — H.264 plays everywhere.
- Click Continue. macOS creates a new compressed copy beside the original. The encode uses the hardware video engine on Apple Silicon, so a 5-minute 4K clip typically finishes in 15–20 seconds on an M1 or later.
Method 3: The Photos App Trim + Re-Save
If the file is too long rather than too high-resolution, the Photos app is the cleanest path.
- Drag the video file into Photos (or find it if it synced from iCloud).
- Double-click to open, then click Edit in the top right.
- Drag the yellow handles on the timeline to trim out dead air, intro silence, or end credits.
- Click Done, then File → Export → Export Video.
- In the Export sheet, drop the resolution to 1080p and click Export.
This is the right path when you have a 10-minute screen recording but only need to share the 90 seconds in the middle. Trimming first removes minutes of bitrate before any compression even happens.
Method 4: iMovie Share → File (The Quality-First Path)
For anyone who already has iMovie (free on every Mac), the Share → File dialog gives finer control than QuickTime.
- Open iMovie, create a new project, and drag the video onto the timeline.
- In the top right, click Share → File.
- Pick:
- Resolution: 1080p
- Quality: Medium or High (Medium is the "I need to email this" target)
- Compress: Faster (uses hardware encoder) or Better Quality (uses software encoder, takes longer but smaller files at the same visual quality)
- Click Next, name the file, and save.
The "Better Quality" setting on iMovie is the closest thing macOS has to a 2-pass encode out of the box. For a 4K master that you need to share via email, this typically produces a smaller and cleaner file than the QuickTime Export As path.
The HEVC Trick: Half the Size, Same Quality
Every Mac shipped since 2018 includes hardware HEVC (H.265) acceleration. HEVC encodes the same visual content into roughly 40–50% less file size than H.264 at the same quality. The only catch is compatibility — HEVC plays natively on Apple devices and modern Android, but older Windows machines may need a codec install.
Use HEVC when:
- The recipient is on a Mac, iPhone, iPad, or modern Android phone.
- The video will live on your own machine and you want to free disk space.
- The video is going to YouTube, Vimeo, or any platform that re-encodes anyway.
Stick with H.264 when:
- The recipient is on an older Windows machine or unknown system.
- The video is going into a corporate workflow that may not support HEVC.
- You need maximum compatibility across email, Slack, or messaging apps.
AirDrop's Hidden "Send Lighter Version"
When you AirDrop a video from your iPhone to your Mac (or another iPhone), iOS sometimes asks if you want to send a "Lighter Version." This is HEVC-encoded at a lower bitrate. For most messaging cases, the lighter version is fine — it stays visually identical on a phone screen at roughly one-quarter the size.
If you regularly compress videos to send to friends, this is the fastest "compression" path that exists on Apple devices, because no manual encoding is needed.
Mistakes That Waste Time on Mac
- Compressing inside the same folder over and over. Every re-encode loses a small amount of quality. If you compress a 4K master once for email and once for messaging, both files are slightly degraded copies of the original. Keep the master untouched and re-encode from it each time.
- Using third-party "Mac cleaner" apps that promise video compression. Many install profiles or background daemons. Use QuickTime, Finder, Photos, or iMovie — all four are signed by Apple and run only when you launch them.
- Forgetting that iCloud Photos already optimizes. If your videos are stored in iCloud with "Optimize Mac Storage" enabled, the file on disk may already be a compressed proxy. Compressing it again before sending is fine, but the original 4K master is in the cloud and may produce a larger file if you redownload it first.
- Exporting HEVC for a Windows user. It works most of the time but some Outlook + Windows combinations will refuse to preview the file inline.
Capture Lightweight From the Start
The fastest compression is the one you never have to do. If most of your file-size problems come from screen recordings — long tutorials, app demos, bug reports — the right capture tool produces files that are already small enough to share, without an encoding step.
Cubix Capture on macOS records at a tuned 1080p H.264 bitrate by default and uses the Apple Silicon video engine for HEVC export, so a 2-minute screen recording is typically 8–15MB on disk before any re-encoding step. Combined with smart auto-zoom that keeps the focused region readable after downscaling, the resulting file is usually ready for email, Slack, or Loom-style sharing as-is.
For one-off compressions of existing footage, the video compressor handles the choice of H.264 vs HEVC automatically based on your target file size.
Related reading:
- How to Record a 4K Screen on a MacBook Without Lag — for capturing dense visual content at high resolution on Mac.
- How to Capture System Audio on Mac Without Installing Drivers — the other Mac-native trick for clean recordings.
- 7 Best Screen Recorders for Mac in 2026 — for choosing the tool that produces the smallest files at the source.
Keep your Mac running fast and your video sharing painless. Native tools are right there — you just have to know which one to use.