You just made the switch to a Chromebook. You open your laptop, find an image you want to save or an error message you need to send to IT, and you look down at the keyboard.
There is no "Print Screen" key. There is no "Command" key.
Because Chrome OS is a streamlined, web-first operating system, Google completely redesigned the keyboard layout. They removed legacy keys that most people never used and replaced them with dedicated web navigation keys. While this makes browsing the internet incredibly fast, it makes taking your first screenshot incredibly confusing.
Do not worry, Chrome OS actually has one of the most powerful and intuitive screen capture tools built directly into the system. You just need to know which keys to press. Here is the definitive guide to taking a screenshot on any Chromebook. (Switching over from another machine? Our master guide to taking a screenshot on any device maps the equivalent shortcuts on Windows, Mac, and phones.)
The Secret Key: The "Show Windows" Button
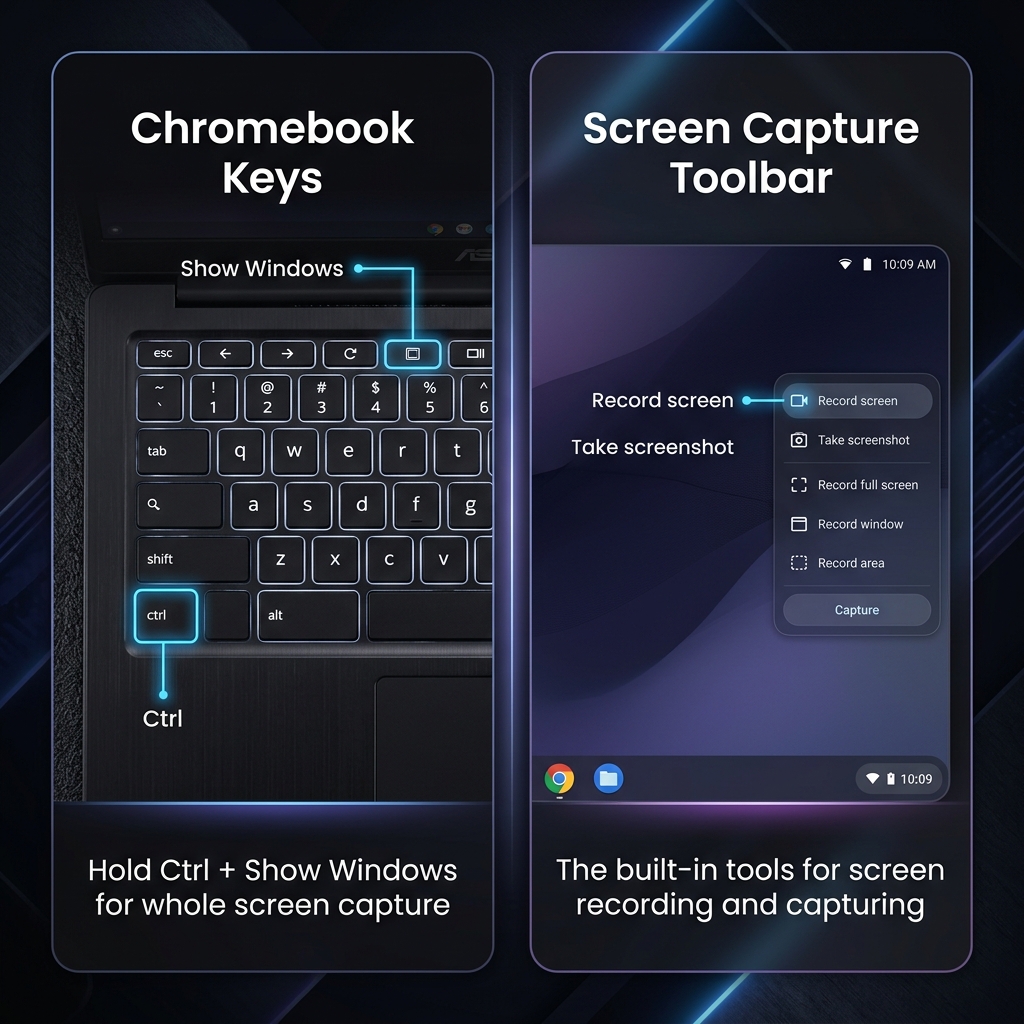
Before you can use any of the keyboard shortcuts, you have to locate the Show Windows key.
Look at the top row of your keyboard (where the F-keys normally live). Find the key that looks like a rectangle with two vertical lines to its right. It is usually located right above the number 6, perfectly in the middle of the row.
Once you find that key, you have unlocked the entire screen capture ecosystem.
Method 1: Capture the Entire Screen
The Shortcut: Ctrl + Show Windows
If you want to instantly snap a picture of absolutely everything currently visible on your monitor, this is the fastest method.
How it works:
- Hold down the Ctrl key and press the Show Windows key.
- Your screen will briefly flash.
- A small notification will pop up in the bottom right corner of your screen (called the "Tote"), confirming the image was saved.
(Note: If you are using a standard Windows keyboard plugged into your Chromebook, the shortcut is Ctrl + F5).
Method 2: Capture a Specific Area (The Snipping Tool)
The Shortcut: Ctrl + Shift + Show Windows
You rarely need to show someone your entire browser window. If you just want to grab a specific paragraph, an image, or a single email, this is the shortcut you will use daily.
How it works:
- Press Ctrl + Shift + Show Windows.
- Your screen will dim, and your mouse cursor will turn into a crosshair.
- Click and drag a box over the exact area you want to capture.
- Let go of the mouse to take the shot.
Enjoying this read?
Get weekly insights on video editing, AI workflows, and creator growth straight to your inbox.
Method 3: The No-Keyboard Method (Quick Settings)
If you do not want to memorize keyboard shortcuts, or if you want to access advanced features like screen recording, Google built a beautiful capture menu directly into the taskbar.
How it works:
- Click on the Time/Clock in the bottom right corner of your screen to open the Quick Settings panel.
- Click the Screen capture icon.
- A floating toolbar will appear at the bottom of your screen.
- From left to right, you can choose to capture the Full Screen, a Partial Screen, or a Specific Window.
- Just click your desired option, and click anywhere on the screen to confirm the capture.
Pro-Tip (Screen Recording): On this exact same toolbar, there is a toggle switch with a video camera icon. Clicking this turns your screenshot tool into a full screen recorder, capturing video of your screen with microphone audio. If you also need the audio playing from the Chromebook itself (system sound), see our dedicated guide on how to record a screen with audio on a Chromebook.
Method 4: How to Screenshot in Tablet Mode
If you are using a 2-in-1 Chromebook and have the keyboard flipped all the way back into tablet mode, the keyboard shortcuts obviously will not work. In this mode, Chrome OS adopts the universal smartphone standard.
How to do it: Press the physical Power button and the Volume Down button on the side of your device at the exact same time. The screen will flash, and your screenshot will be saved.
Where Do the Screenshots Go?
By default, Chrome OS handles files a bit differently than a Mac or a PC.
Whenever you take a screenshot, it is automatically saved to your Downloads folder. You can find it by clicking the circle icon in the bottom left corner of your screen (the Launcher), typing "Files," and opening the Files app.
Alternatively, Chrome OS has a feature called the Tote, a holding space for your most recent files. Just look at the taskbar next to the clock; you will see a small preview circle of your most recent screenshot. Click it to instantly drag and drop it into an email or a document.
When a Screenshot Isn't Enough
Mastering the Chrome OS capture tool is perfect for sharing quick visual notes or saving receipts. But when you need to walk someone through a complex workflow, record a client onboarding tutorial, or pitch an investor, a still image — or a raw, unedited recording — simply won't land the way a polished one does. (Not sure which you need? Here's the difference between screen recording and screen capture.)
When you're ready to graduate from basic captures and start instantly generating breathtaking, auto-zoomed, cinematic video walkthroughs — with no editing timeline at all — explore Cubix Capture.
Don’t miss the next one.
Join our newsletter for exclusive tips, product updates, and the latest from the Cubix team.