If you are a Windows user looking to capture your screen, you have likely encountered a digital crossroads. On one hand, you have the classic, rapid-fire keyboard shortcuts like Windows + PrtScn. On the other hand, Microsoft has heavily integrated the modern Snipping Tool, summoned by Windows + Shift + S or the PrtScn key in newer updates.
It is easy to assume they do the exact same thing, but underneath the surface, these two methods serve completely different workflows. One is built for raw speed and archiving; the other is designed for precision and communication.
So, which one should you actually be using? It is one of the most common questions Windows users have, so let's break down the facts, cut through the confusion, and find out which method is genuinely better for your daily tasks. (If you just want the full list of keystrokes without the comparison, our every Windows screenshot keyboard combo cheat sheet has them all.)
The Contender: Traditional Screenshot Shortcuts
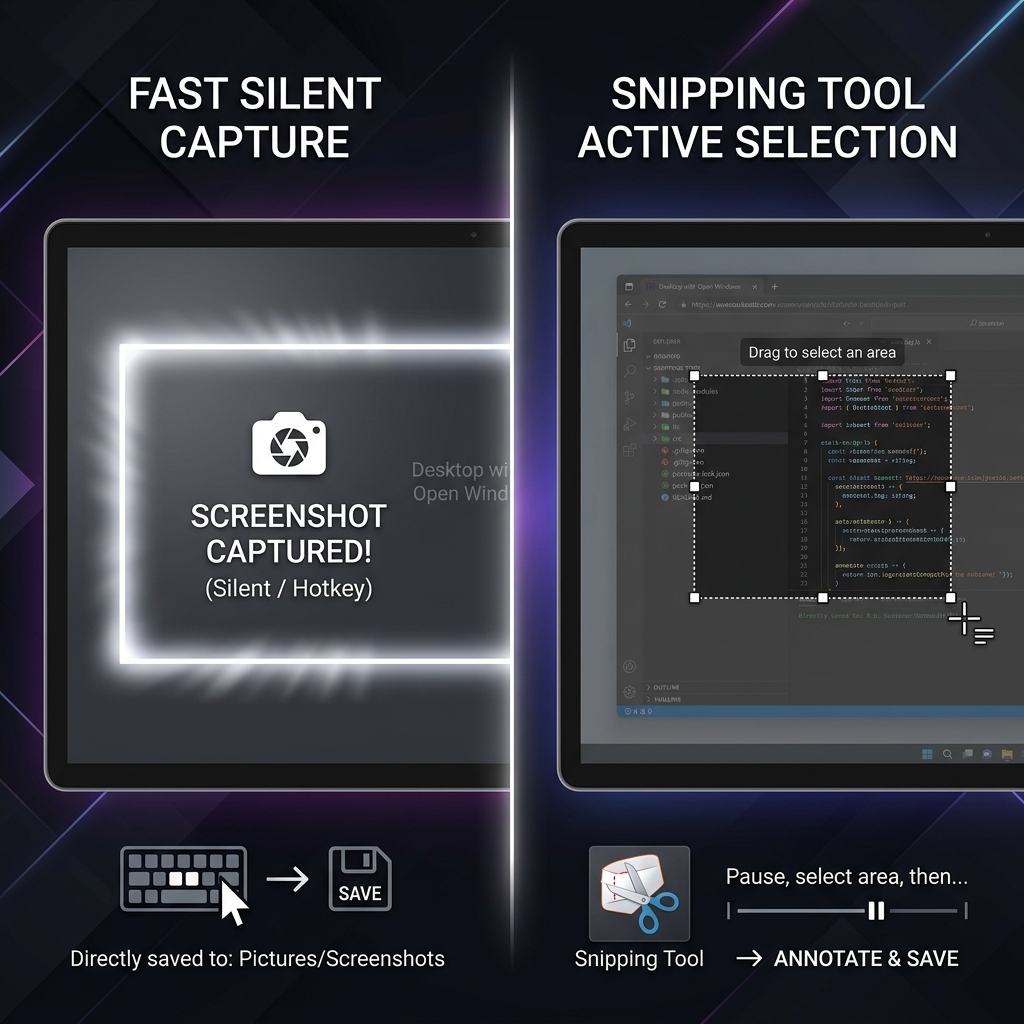
When we talk about "Screenshot Shortcuts," we are referring to the legacy, silent keyboard combinations that execute a capture instantly without pulling up any menus or user interfaces.
The Core Shortcuts:
Windows + PrtScn: Instantly saves a PNG of your entire screen directly to your hard drive (Pictures > Screenshots).Alt + PrtScn: Instantly copies an image of only your active application window to your clipboard.
The Pros
- Zero Interruption: Your screen flashes for a millisecond, but your workflow is completely undisturbed. You don't have to pause a video, exit a game, or deal with drop-down menus.
- Instant File Creation: If you need to take 20 screenshots in rapid succession (like capturing slides during a live webinar),
Windows + PrtScnis unbeatable. It creates the files instantly without you needing to manually save each one.
The Cons
- Messy Output: It captures everything. If you only wanted to show a specific error code, you are sending a massive image that includes your cluttered desktop, your taskbar, and your embarrassing browser tabs.
- Requires Secondary Software: To crop or highlight anything, you have to open the file in another program like Paint or Photoshop.
The Contender: The Windows Snipping Tool
The Snipping Tool is Microsoft’s modern, built-in screen capture overlay. It is the default utility summoned when you press Windows + Shift + S (or, on Windows 11, simply pressing the PrtScn key).
The Pros
- Ultimate Precision: Your cursor turns into a crosshair, allowing you to drag a box over exactly what you want. No cropping required later.
- Built-in Markup: As soon as you take a snip, a notification pops up. Clicking it opens an editor where you can use highlighters, pens, and rulers to annotate your image.
- Text Extraction (OCR): In modern Windows updates, the Snipping Tool can scan your screenshot for text. If you screenshot an uncopyable PDF or an image, you can click a button to extract the text and paste it elsewhere.
- Screen Recording: The Snipping Tool now includes a built-in video recording tab to capture motion.
Enjoying this read?
Get weekly insights on video editing, AI workflows, and creator growth straight to your inbox.
The Cons
- Slower Workflow: It requires you to stop what you are doing, draw a box, and manually save the file if you want a hard copy (though it does save automatically to a default folder in the newest Windows 11 builds, it still interrupts the screen).
- Can Break Pop-up Menus: If you are trying to capture a delicate drop-down menu or hover-state, pressing the Snipping Tool shortcut will sometimes cause the menu to disappear before you can capture it.
Feature Comparison Breakdown
For a quick reference, here is how the two methods stack up against each other:
| Feature | Screenshot Shortcuts (Win + PrtScn) | Snipping Tool (Win + Shift + S) |
|---|---|---|
| Speed of Capture | Instantaneous | Requires manual selection |
| Workflow Interruption | None (Silent background capture) | High (Screen dims, overlay appears) |
| Default Output | Full Monitor (or Active Window) | Custom Cropped Area |
| Built-in Editor | No | Yes (Pen, Highlighter, Ruler) |
| Text Extraction (OCR) | No | Yes |
| Best Used For... | Archiving webinars, gaming, bulk saving | Sharing specific notes, bug reporting |
The Verdict: Which Is Better?
There is no singular "better" tool—only the right tool for the specific job.
Use the Traditional Shortcuts if...
You are archiving information. If you are watching a fast-paced presentation, playing a video game, or need to save a receipt instantly without dealing with menus, rely on Windows + PrtScn. It is the undisputed king of raw speed.
Use the Snipping Tool if... You are communicating with another human. If you are sending an image in an email, dropping it into a Slack channel, or putting it in a presentation, use the Snipping Tool. The ability to crop out irrelevant clutter and highlight the specific point of interest makes you a much better digital communicator.
The Bottom Line
Stop thinking of this as a permanent choice and start thinking of it as two tools on the same belt. Keep Windows + PrtScn mapped for fast, silent archiving, and keep Windows + Shift + S ready for the moments you need to crop and annotate before sharing. The best Windows users do not pick a side — they switch instantly based on the task in front of them. (Prefer to skip the Snipping Tool altogether? Here are the alternatives that bypass it.)
Coming soon: Cubix Snap. Whichever method you land on, Snap picks up where both leave off — turning a plain screenshot into something genuinely shareable with elegant backgrounds, clean markup, and one-click background removal.
When Neither Tool Is the Right One
Here is the limitation both methods share: they produce a still. The moment you are explaining something with more than one step — a software bug, an onboarding flow, a feature walkthrough — a single frame forces you to compensate with arrows, callouts, and long paragraphs of text.
That is where a short screen recording quietly wins. Cubix Capture records your screen and automatically turns it into a smooth, auto-zoomed walkthrough that looks professionally edited — no timeline, no editing skills. It is the upgrade for the moment a screenshot, by either method, simply can't say enough.
Don’t miss the next one.
Join our newsletter for exclusive tips, product updates, and the latest from the Cubix team.