
You have spent hours refining your lesson plan, setting up your microphone, and practicing your software walkthrough. You click record, film a flawless take, and export the file only to realize the text looks blurry, the video transitions feel choppy, or your voice sounds thin and metallic.
When you are creating software tutorials, digital course lectures, or YouTube tech walkthroughs, your recording configuration is everything. Unlike vlogs or cinematic talking-head clips, tutorials feature highly complex, detailed visual assets: tiny code syntax, fine lines on database rows, and small dropdown menus. If your configuration parameters are misaligned, your video will look pixelated or unreadable, especially on small smartphone viewports.
You don't need a degree in broadcast engineering to fix this. Whether you use an open-source powerhouse like OBS Studio or a lightweight desktop recorder, here is the definitive guide to the perfect screen recording settings for software tutorials.
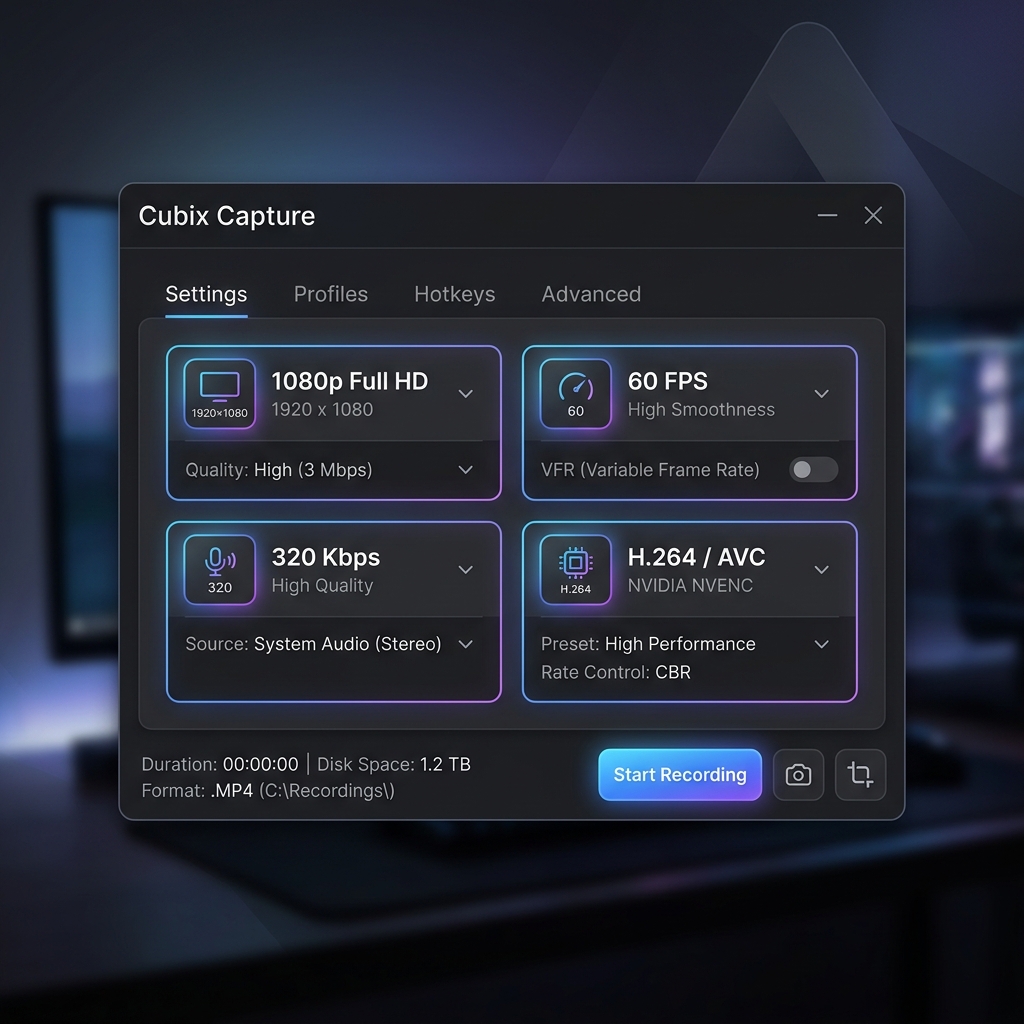
1. Resolution & Aspect Ratio: Crisp Text Framework
The absolute baseline for any educational screen recording is 1080p Full HD (1920x1080) running at a native 16:9 aspect ratio.
- The Ultra-Wide Monitor Trap: If you are using a premium ultrawide monitor (like a 21:9 or 32:9 display), do not record your full desktop canvas. When an ultrawide canvas is forced onto a standard player window or mobile device, giant black bars will choke the top and bottom of your footage, and your application layout will shrink aggressively into an unreadable sliver.
- The Fix: Resize your target application window to a standard 16:9 proportion, or drop your monitor's display resolution down to 1920 × 1080 in your system settings before hitting record.
2. Frame Rate (FPS): Pacing the Screen Animation
For traditional talking-head video clips, the film standard is 24fps or 30fps. However, software tutorials require a different blueprint.
- The Standard: 60 FPS (Frames Per Second)
- Why it Matters: When you are gliding your mouse cursor across code blocks, demonstrating complex timelines in video editors, or pulling down dropdown settings, 60fps delivers silky-smooth motion. It prevents your cursor from looking like it's lagging across the screen and keeps the viewer's eye anchored comfortably to your points of focus.
3. Bitrate & Codec: Eliminating the Blur
Your bitrate determines how much visual data your computer processes every second. If your bitrate is configured too low, your video will suffer from aggressive blocky pixelation during high-motion pans or clicks.
| Recording Quality | Target Bitrate Range | Recommended Video Codec |
|---|---|---|
| 1080p at 30 FPS | 4,000 – 6,000 Kbps | H.264 / AVC |
| 1080p at 60 FPS | 6,000 – 9,000 Kbps | H.264 / HEVC |
| 4K at 60 FPS | 20,000 – 35,000 Kbps | HEVC (H.265) / AV1 |
Pro-Tip on Codecs: For standard desktop tutorials, lock your video encoder to H.264 (AVC) or HEVC (H.265). If your software offers hardware-accelerated encoders like NVIDIA NVENC, AMD AMF, or Apple's hardware engine always select those. They offload the processing from your CPU to your graphics card, ensuring your tutorial records flawlessly without lagging your system apps.
Enjoying this read?
Get weekly insights on video editing, AI workflows, and creator growth straight to your inbox.
4. Audio Configuration: The Trust Asset
Audiences will easily forgive a slight dip in video resolution, but if your audio features a constant background hum, digital clipping, or sounds like you are presenting from inside a vacuum chamber, they will leave within seconds.
- Sample Rate: Set your software's audio configuration to 48 kHz (the global media broadcast standard) rather than 44.1 kHz.
- Audio Bitrate: Set your track allocation to 320 Kbps to ensure your vocal spectrum retains full depth and rich resonance.
- Channel Mapping: Always record your main vocal microphone track in Mono. If you record a single microphone capsule in Stereo, your students wearing headphones will frequently hear your voice playing exclusively out of one ear.
The Staging Framework for Flawless Output
Configuring your internal software dials is only half the battle. To guarantee an enterprise-grade tutorial output, follow this precise operational checklist every time you prepare a recording session:
-
Sanitize Your Digital Canvas: Prune background visual clutter. A messy screen shatters student focus. Hide your desktop icons, clear out unrelated browser tabs, hide your browser bookmarks bar (
Ctrl + Shift + B), and toggle your operating system to Do Not Disturb mode to block personal alerts or calendar notifications from popping up mid-take. -
Lock in Your Hardware Targets: Align your hardware processing chains explicitly. Open your recording software options. Verify that your microphone input channel is pointing explicitly to your external USB/XLR microphone never accidentally rely on internal laptop arrays. If you are demonstrating app noises, ensure "System Audio Capture" is toggled on.
-
Slow Down Your Physical Choreography: Gives tracking software and viewers time to process. Move your mouse cursor across your application layout at half-speed. When approaching a button or settings field, hover over it for one full second before clicking, and leave your pointer resting there for a moment afterward. This calm pacing keeps your students locked in and provides clean tracking cues.
-
Execute a 10-Second Test Record: Verify video sharpness and signal routing. Before filming a 30-minute tutorial module, record a quick 10-second test snippet of you speaking while moving your mouse. Play it back with headphones to verify your microphone volume is crisp, your resolution is sharp, and your software is capturing your targeted apps perfectly before committing to the full lesson.
Bypassing the Technical Math: Upgrading to Cubix Capture
While manually tweaking bitrates, audio frequencies, and hardware encoders in complex tools like OBS Studio is fantastic for technical power users, it can eat up immense creative energy. Furthermore, standard recorders still leave you with a flat, rigid pixel map. Since over half of your audience watches tutorials on smartphones, full-screen captures make labels look microscopic on mobile viewports.
To fix that without spending hours manually keyframing zoom animations on a heavy video editing timeline, creators are moving their workflows to Cubix Capture.
Instead of forcing you to memorize encoder configurations, Cubix Capture automates your video design and cinematography while you talk:
- Algorithmic Focal Zooming: It automatically tracks your cursor movements and clicks. The exact millisecond you click a dropdown menu or input a line of text, the canvas smoothly pans and magnifies that visual region, ensuring perfect mobile readability automatically.
- AI Cursor Path Smoothing: It catches naturally frantic or jittery trackpad movements and converts them into a fluid, elegant sweep that calmly guides the viewer's eye.
- Instant Brand Staging: It automatically isolates your open application windows and frames them against gorgeous canvas backgrounds, while placing your webcam into a clean floating geometric bubble with automated studio background blurring natively.
If you are a streaming engineer building an advanced live multi-camera broadcast stream, mapping out your H.264 bitrates and locking your canvas to 60fps in OBS will ensure a stable data feed. But if your goal is to save your calendar, protect your energy, and produce beautiful, mobile-optimized software tutorials instantly, moving your setup to a smart, automated platform like Cubix Capture handles the entire technical framework for you seamlessly.
Related reading:
- 60fps vs 30fps Screen Recording: What's the Difference?
- 4K Screen Recording: Pros and Cons
- How to Record a 4K Screen on a MacBook Without Lag
📖 Keep reading: decide whether the settings grind is even worth it in free vs paid screen recorders for tutorial makers.
Don’t miss the next one.
Join our newsletter for exclusive tips, product updates, and the latest from the Cubix team.