
If you have watched a software tutorial, a coding walkthrough, or a product demonstration video recently, you have likely noticed a major leap in video design.
A creator clicks a small settings icon, and the camera seamlessly glides inward to magnify the choice. They type into a terminal box, and the screen smoothly pans to make the code syntax perfectly clear. There are no sudden, jarring cuts just a fluid, cinematic motion that looks like a professional camera operator is live-tracking the cursor across the screen.
Historically, achieving this level of polish required hours of painstaking post-production editing. Today, elite educators, founders, and creators are completely automating this process using Auto-Zoom Screen Recording.
But what exactly is auto-zoom, how does it function under the hood, and why has it rapidly become the definitive standard for modern video creation? Let’s pull back the curtain.
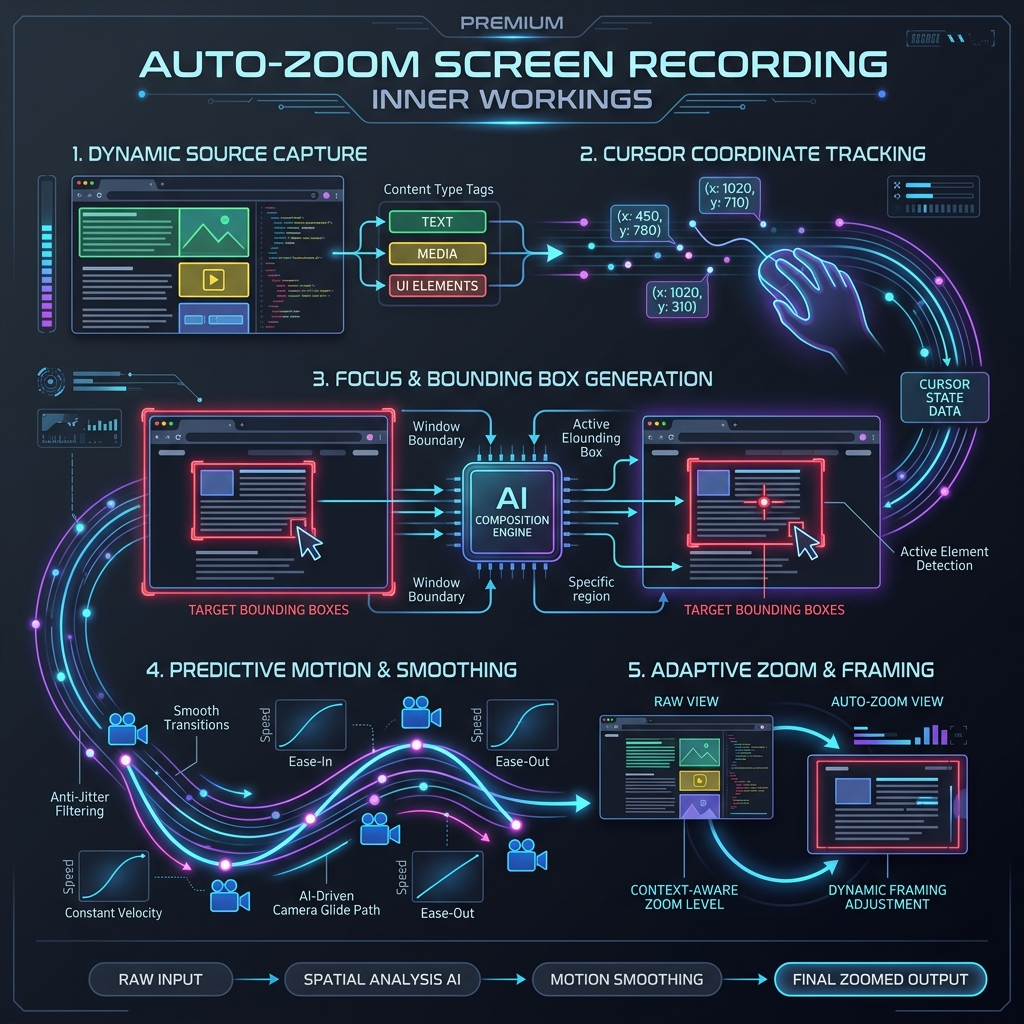
How It Works Under the Hood
Traditional screen recorders operate like passive security cameras. They blindly take a flat pixel map of your entire monitor and dump it into a raw file. If you move your mouse to the corner of a 4K display, the recorder logs those pixels from afar, completely unaware of what you are actually doing.
An auto-zoom recorder, such as Cubix Capture, acts like an intelligent, virtual camera director. While you present and move your mouse naturally, the software runs real-time metadata tracking pipelines in the background. It dynamically monitors:
- Your exact cursor coordinates ($X$ and $Y$ anchor pixels).
- Physical click triggers and active text inputs.
- The bounding boxes of structural application windows.
The exact millisecond you perform an action like opening a dropdown settings panel or focusing on a code field the software applies predictive framing math. It scales the canvas down to a focused crop region and uses smooth interpolation curves to glide the camera inward toward the point of interest. It handles the cinematography on the fly, eliminating manual post-production adjustments entirely.
Why You Need It: The Core Competitive Advantages
Shifting your creative stack to an auto-zoom workflow fixes three massive bottlenecks that flat, legacy recordings actively create.
1. It Solves the Mobile Readability Crisis
Over 60% of digital educational content is now consumed on small smartphone viewports. If you record a software dashboard or a data spreadsheet on a large desktop monitor, it looks crisp and readable to you while filming. But when that massive desktop environment is squeezed onto a 6-inch phone display, text shrinks aggressively.
The moment a student has to squint or pause your video to read a setting, cognitive fatigue sets in and they swipe away. Auto-zoom removes this friction natively. By automatically magnifying active regions, labels remain crisp, large, and 1:1 readable on mobile devices.
2. It Drives Massive Viewer Retention Spikes
Human eyes are naturally wired to track motion and depth shifts. When a software video remains completely stationary and flat for ten straight minutes, the viewer's brain quickly categorizes it as a static document. Visual boredom sets in, attention drifts, and they exit the tab.
Auto-zoom introduces dynamic pacing. The subtle camera glides, organic pans, and focus shifts mimic high-end film production standards. This gentle visual stimulation keeps the viewer's brain highly engaged, leading to a massive boost in Average View Duration (AVD) the golden metric that recommendation algorithms use to promote digital content channels.
3. It Instantly Eradicates the "Timeline Tax"
The traditional method of adding zoom animations manually to a video file is incredibly tedious:
-
Step 1: Flat Raw Capture You record your full desktop canvas completely flat, capturing all background mess and erratic mouse movements.
-
Step 2: Import & Slice Timeline You open a heavy video editor (like Premiere Pro) and chop the raw file into dozens of small fragments based on your cursor positions.
-
Step 3: Animate Keyframes Manually You spend hours calculating zoom percentages, moving anchor points, and tweaking ease curves for every individual zoom frame.
-
Step 4: Render & Export Wait You wait for your computer to process the heavy timeline coordinates and compile a final, heavy MP4 video asset.
With auto-zoom recording, this timeline is completely flattened into a zero-second wait. Because the recording engine processes your camera pans, app window isolation, and layout backgrounds live while you speak, your tutorial video is fully styled and ready to publish the exact millisecond you click stop.
Enjoying this read?
Get weekly insights on video editing, AI workflows, and creator growth straight to your inbox.
The Optimized Production Blueprint
To get the absolute best results from an auto-zoom recorder, stop rushing through your presentation. Follow this simple operational choreography to feed the automated tracking engine pristine data:
-
Sanitize Your Digital Canvas: Prune background distractions before filming. Hide your desktop icons, clear out irrelevant browser tabs, and hide your bookmarks bar. Most importantly, toggle your operating system to Do Not Disturb mode to block personal alerts from hijacking your visual focus.
-
Adopt a Deliberate Physical Pace: Gives real-time tracking engines clean data points. Move your mouse cursor across your application layout at half-speed. When approaching a button, settings block, or dropdown menu, hover over it for one full second before clicking, and leave your pointer resting there for a split second afterward. This calm pacing allows the camera engine to glide elegantly.
-
Hit Stop and Share Instantly: Skip the manual post-production editing phase. Conclude your walkthrough. Along with automated focus zooms, smart recorders like Cubix Capture bundle in AI Cursor Path Smoothing to translate naturally frantic, shaky hand movements into fluid sweeps. Your video is instantly polished, beautiful, and ready for your audience.
Summary Value Matrix
| Production Metric | Traditional Flat Captures | Automated Auto-Zoom Captures |
|---|---|---|
| Mobile Screen Delivery | Microscopic labels (High bounce rate) | Crisp, magnified layouts (High retention) |
| Viewer Brain Fatigue | High cognitive load (Hunting for the cursor) | Zero friction (Visual focus is directed instantly) |
| Cursor Presentation | Jittery, rapid, and distracting trackpad lines | AI-smoothed, elegant cinematic sweeps |
| Time Spent Editing | Hours of manual timeline keyframing | Zero seconds (Processed live while you talk) |
Ultimately, maximizing your content output isn't about pulling longer hours in an editing suite; it's about respecting your viewer's viewport and protecting your own creative calendar. By deploying a smart recording platform like Cubix Capture to handle your framing, cursor smoothing, and auto-zooms dynamically, you can scale a premium, mobile-optimized brand completely on autopilot.
Keep Reading
- How Auto-Zoom Technology Actually Works
- What Is Auto-Zoom in Screen Recording? (And Why It Changes Everything)
- How Auto-Zoom Replaces 90% of Tutorial Video Editing
- Screen Recorder with Auto-Zoom - Every Option in 2026
- How to Add Auto-Zoom to Screen Recordings (No Editing)
Don’t miss the next one.
Join our newsletter for exclusive tips, product updates, and the latest from the Cubix team.