You are setting up an important software tutorial, hosting a business presentation, or recording a private meeting on your computer. You open OBS Studio and prepare to record your screen. But a wave of anxiety hits you: What if a sensitive personal email pops up in the corner of my screen? What if a private Slack message appears while I am presenting?
By default, most beginners configure OBS to record their entire monitor using "Display Capture." While this works, it leaves your digital workspace completely exposed. Any unexpected notification, messy desktop icon, or open browser tab becomes a permanent part of your video.
The professional solution is to tell OBS to look only at one single application window—like a single Google Chrome tab, Microsoft PowerPoint, or a coding workspace. If you minimize that application or drag a private email directly in front of it, OBS will completely ignore the clutter and keep recording only the app you targeted.
Here is how to set up target window recording in OBS Studio in less than two minutes.
Step-by-Step Guide to Window Capture in OBS
To target a single app, you need to swap out your traditional capture source for a specialized framework module baked straight into OBS.
-
Open Your Target Application First: The app must be running for OBS to see it. Before you touch anything in OBS, open the specific app you want to record (e.g., your web browser, a slideshow, or a PDF document). Do not minimize the application to your taskbar; leave it open and running in the background.
-
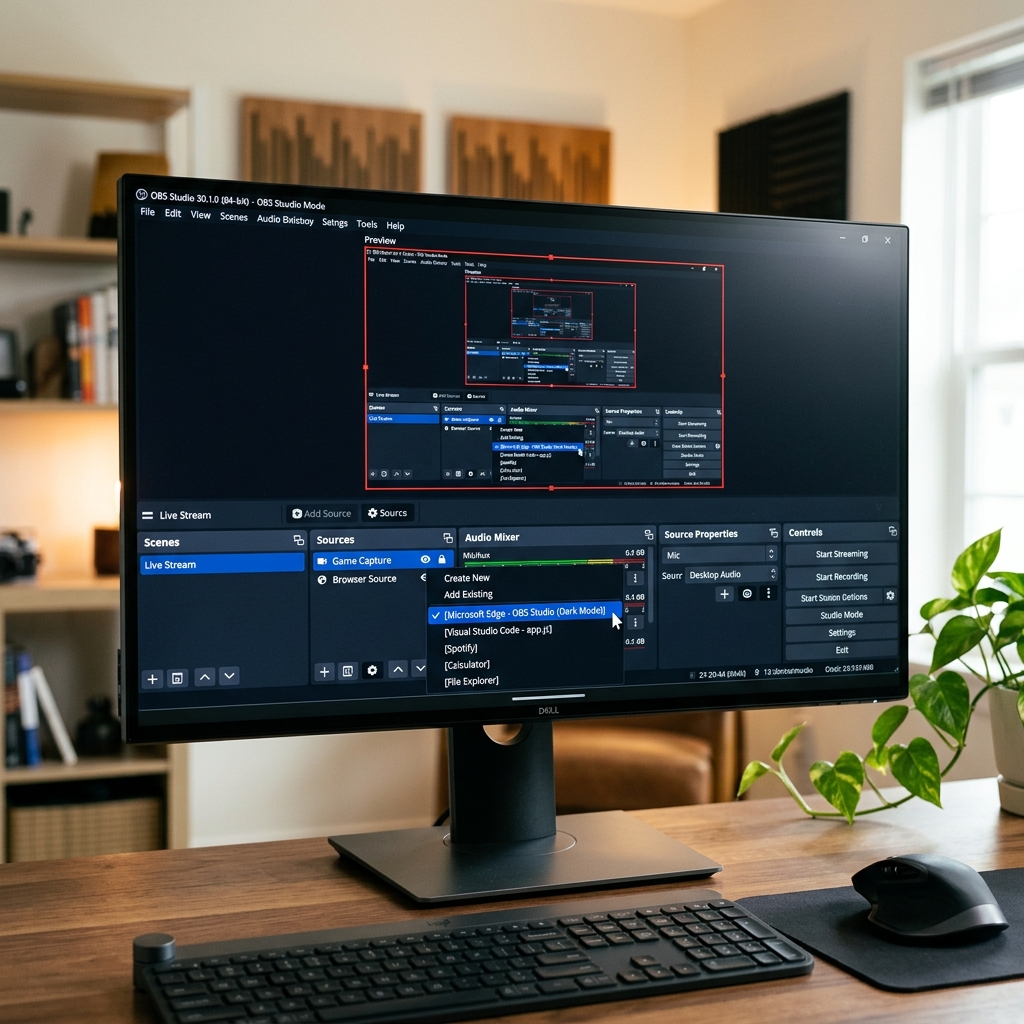
Add a Window Capture Source: Launches the targeted capture framework. Open OBS Studio. Look at the Sources dock at the bottom left of the interface. Click the (+) icon and select Window Capture from the list. Name the source something clear (like "My Browser Window") and click OK.
-
Select Your App From the Dropdown Menu: Locks OBS onto your specific application. A Properties window will appear. Click the dropdown menu next to Window and select your open application from the list.
- Pro-Tip: Leave the Capture Method on "Automatic." If you notice a black screen, change it to "Windows Graphics Capture" on PC or "ScreenCaptureKit" on Mac to force the system hook.
- Fit the Window to Your Canvas: Prevents dead black space in your final video. If the application window does not perfectly fill the black preview screen in OBS, right-click on the name of your source in the Sources list, navigate to Transform, and click Fit to Screen (or use the shortcut Ctrl + F on Windows / Cmd + F on Mac). You are now ready to hit Start Recording.
Enjoying this read?
Get weekly insights on video editing, AI workflows, and creator growth straight to your inbox.
The High-Resolution Dilemma
Isolating a single window solves your privacy concerns beautifully. You can open folders and type out private notes elsewhere on your computer, and your viewers will remain completely oblivious. However, capturing a single window reveals a massive visual flaw built into traditional raw recording software.
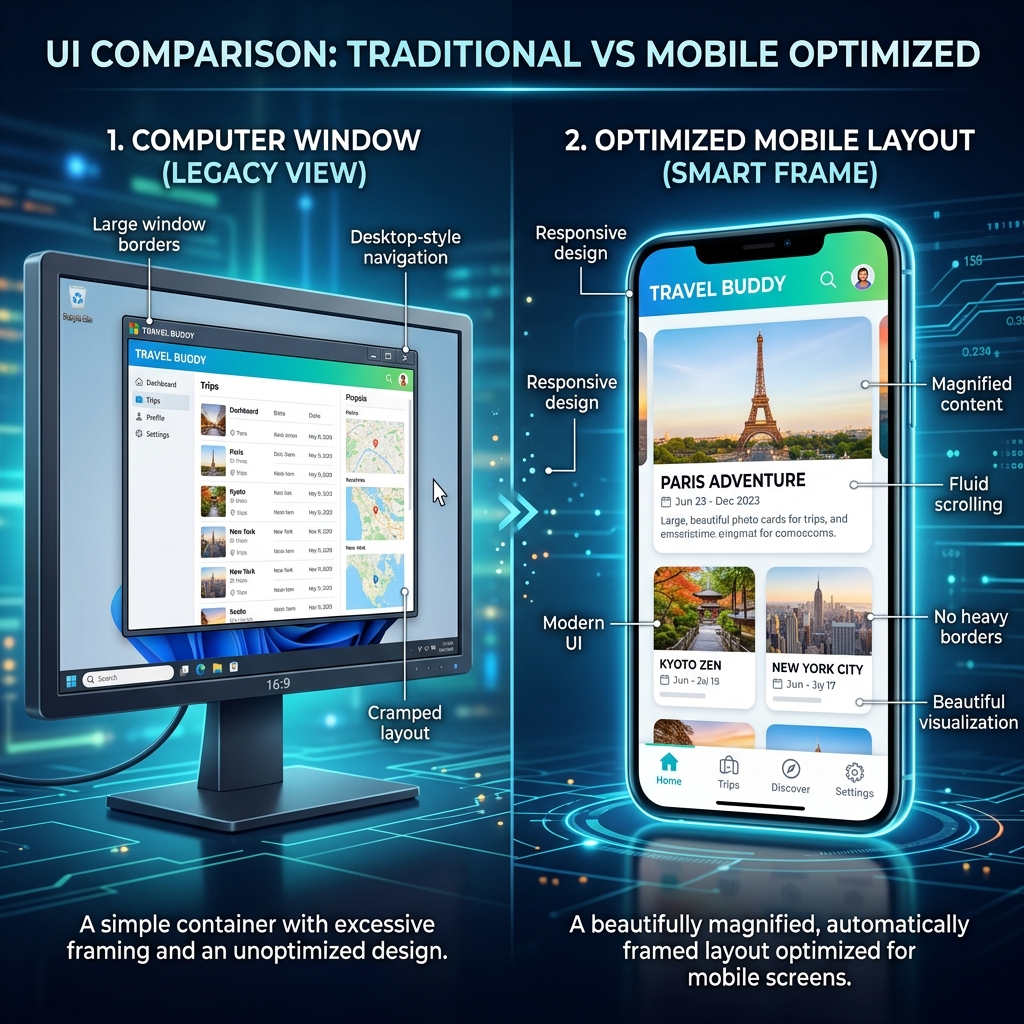
When you isolate a standard software window on a high-resolution laptop or desktop screen, the aspect ratio often leaves massive black bars on the top or sides of your video canvas. To make it fit perfectly, you are forced to stretch the application window or radically alter your system’s display resolution.
Furthermore, if you are making a tutorial or product walkthrough, that isolated window still scales down drastically when your video is watched on a smaller screen. Over 60% of modern video content is consumed on smartphones. When your raw window layout is squeezed onto a mobile phone display, the text becomes microscopic. Your audience is forced to squint to see what menus you are navigating, completely defeating the purpose of your video.
The Smarter, Frictionless Presentation Workflow
If you want your videos to look professional and remain flawlessly legible on any device without wasting your time configuring layout transformations and canvas margins, you need a tool designed for presentation, not just raw recording.
This is exactly why creators, product managers, and founders are upgrading from OBS to Cubix Capture. Instead of acting like a rigid, manual broadcast desk, Cubix Capture operates as an automated digital director, engineering a stunning visual output right while you speak:
- Algorithmic Screen Panning: It completely solves the readability crisis. As you move your mouse and click on menus within your application, Cubix Capture dynamically and smoothly scales up the workspace, guaranteeing that text is beautifully legible on both mobile screens and monitors.
- Cinematic Canvas Framing: Instead of framing your window with dead black borders, Cubix Capture automatically places your active app against gorgeous, dynamic gradient backdrops, providing an instant studio aesthetic with zero effort.
- Frictionless Pointer Smoothing: It actively catches the nervous, shaky micro-movements of your laptop trackpad or physical mouse, translating them into a fluid, elegant glide that anchors the viewer’s eye.
- Instant Cloud Delivery: Because all the cinematic auto-zooms, pointer stabilization, and webcam bubble frames are compiled dynamically, there is no rendering pipeline. The moment you hit stop, a premium cloud link is generated instantly for your clients or team.
Mastering the Window Capture settings inside OBS Studio is an excellent technical skill if you are streaming a gameplay overlay or running a multi-layered live broadcast. But when it is time to build a professional software tutorial, record a presentation, or share a clean digital lesson without wasting your day tweaking canvas parameters, upgrading to a platform built for automated visual clarity ensures your message is delivered perfectly.
📖 Keep reading: The best OBS settings for screen recording, how to add a webcam overlay in OBS, and how to fix an OBS black screen.
Don’t miss the next one.
Join our newsletter for exclusive tips, product updates, and the latest from the Cubix team.