If you are hunting for a screen recorder that leaves no watermarks, imposes no time limits, and is completely free, OBS Studio remains the undisputed heavyweight champion.
However, because OBS is built to handle massive, multi-camera live events for Twitch or television networks, opening it can feel like sitting in the cockpit of a commercial airliner. The default settings are built for standard streaming, not high-quality local recording. If you use out-of-the-box settings, your videos will often look blurry, pixelated, or choppy.
With the rollout of OBS Studio 32.1 in 2026, the software introduced a completely overhauled Modular Audio Mixer and native Hybrid MP4 integration, making it a powerhouse for creators if you know how to configure it. Here are the definitive, master-class settings to optimize OBS for screen recording this year.
Step 1: The Base Setup (Resolution & Framerate)
Before you touch your bitrates, you need to ensure OBS matches the physical grid of your computer monitor.
- Open OBS and navigate to Settings in the bottom right corner, then click the Video tab.
- Set Base (Canvas) Resolution to match your actual monitor size (e.g.,
1920x1080for Full HD, or3840x2160for 4K). - Set Output (Scaled) Resolution to match your Base resolution perfectly. Do not downscale your recording, or your text will get blurry.
- Set Common FPS Values to 60. This ensures smooth mouse tracking and software animations.
Step 2: The Core Recording Settings (The Secret Sauce)
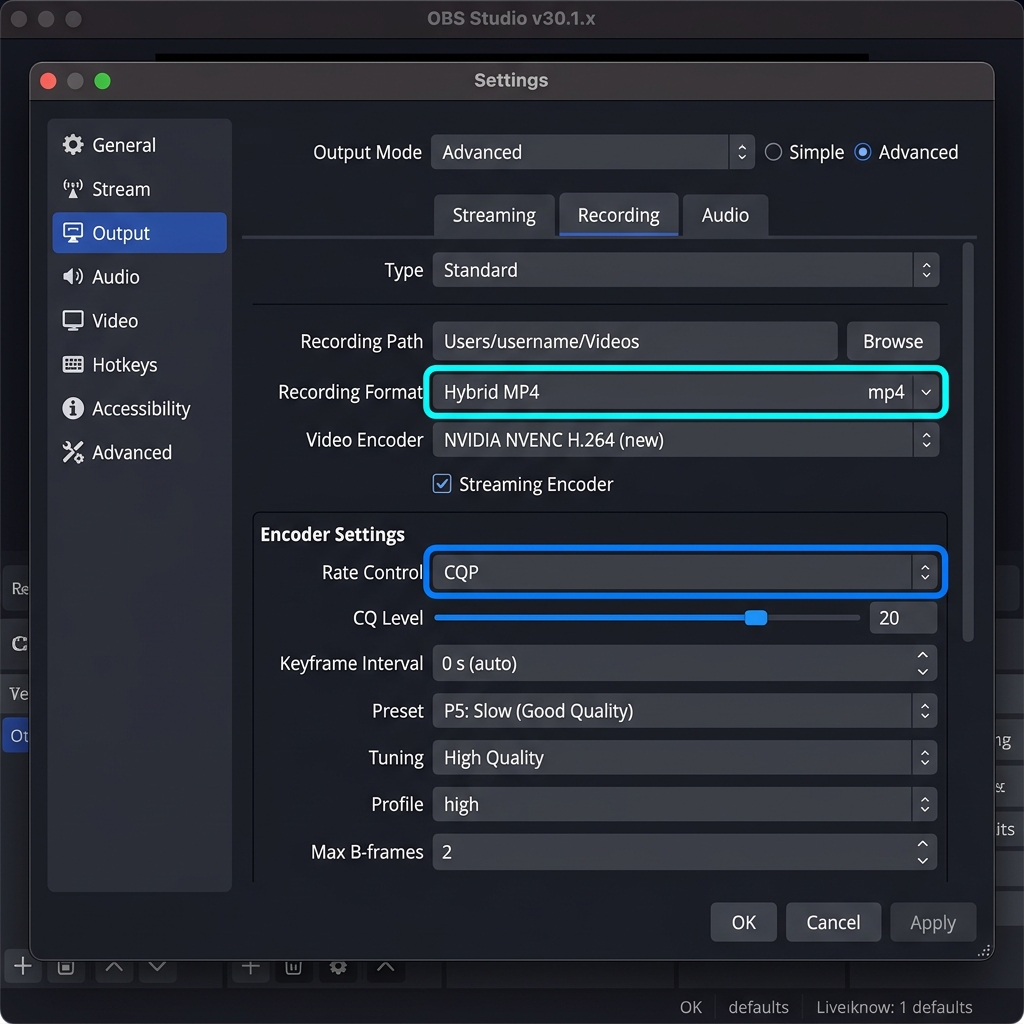
Navigate to the Output tab on the left sidebar. Change the Output Mode dropdown at the very top from Simple to Advanced, then click the Recording tab.
Configure these fields exactly to unlock flawless video quality:
-
Set Recording Format to Hybrid MP4: A breakthrough safety standard for 2026. Historically, recording directly to a standard MP4 was dangerous; if your PC crashed, the whole file was lost. In 2026, select Hybrid MP4. It gives you a standard, widely compatible MP4 file that is completely crash-resilient. If your power cuts out, your footage is perfectly saved up to that exact second.
-
Choose a Hardware Video Encoder: Offloads the intense processing from your CPU. Click the Video Encoder dropdown. Never leave this on x264 unless you have no choice. Select a hardware chip: NVIDIA NVENC (H.264 or AV1), AMD HW, or Apple VT H.264. This uses a dedicated, physical chip on your graphics card to handle the heavy video compression, completely eliminating recording lag.
-
Switch Rate Control to CQP: Forces OBS to prioritize visual crispness over bandwidth. Change Rate Control from CBR (Constant Bitrate) to CQP (Constant Quantization Parameter). CBR is for live streaming. CQP is strictly for local recording — it dynamically feeds data to your video based on how complex the visuals are.
-
Dial in Your CQ Level: The golden sweet spot for text legibility. Set your CQ Level to 18. A lower number yields higher quality but a bigger file size. 18 is the golden industry standard where software menus, text, and graphics look incredibly crisp, mimicking a lossless image perfectly.
Enjoying this read?
Get weekly insights on video editing, AI workflows, and creator growth straight to your inbox.
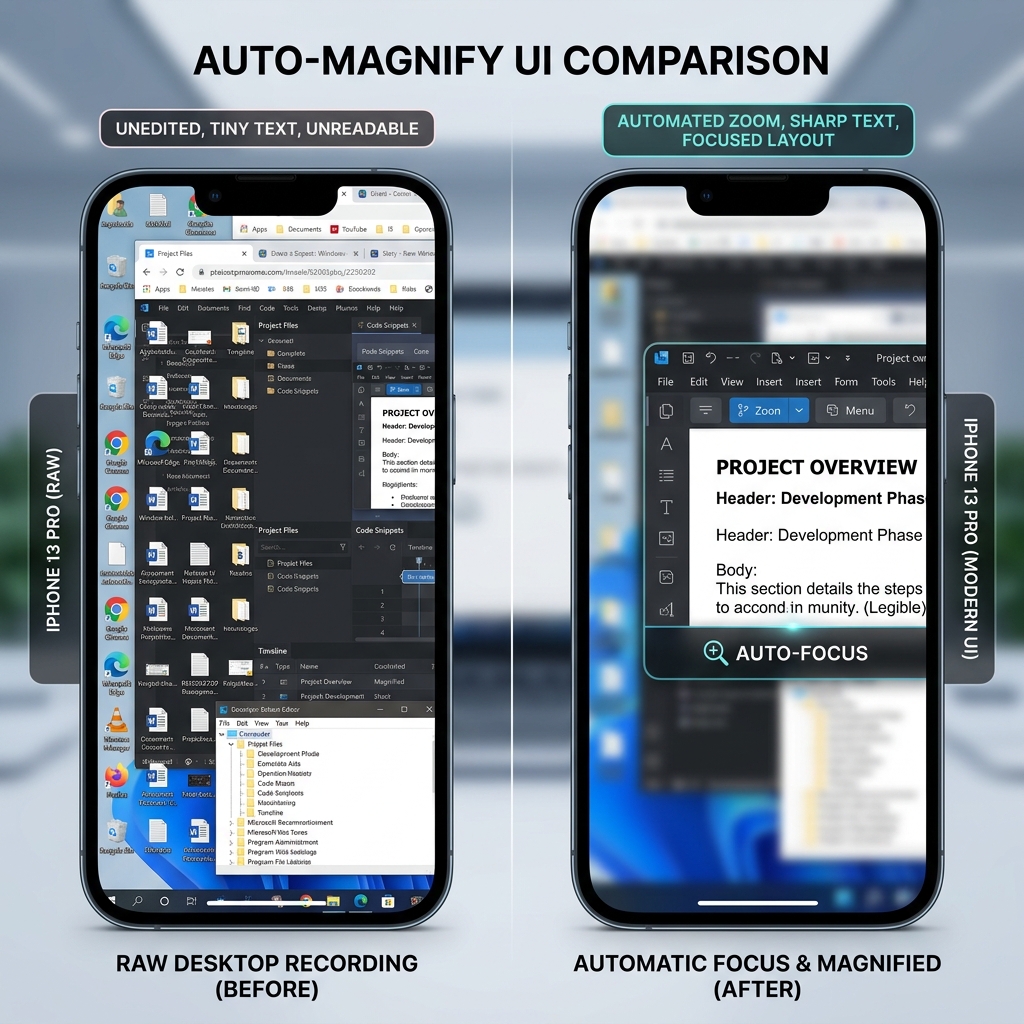
The Massive Drawback of Raw Pixel Capture
Applying these master settings gives you an elite, crystal-clear local video file. However, OBS operates exactly like a blind security camera, it records raw pixels exactly as they exist on your monitor. This creates a massive problem for modern tutorials, client updates, and demos.
If you record a walkthrough on a large desktop monitor, the text looks readable to you. But in 2026, over 60% of web content is consumed on mobile phones. When your raw OBS presentation shrinks down to fit a small smartphone screen, the software text becomes microscopic.
Furthermore, moving a physical mouse across a desk naturally creates nervous, jittery movements. To fix "tiny text" and erratic cursors using OBS, you are forced to import that heavy video file into a complex editing program like Premiere Pro, spending hours manually adding zoom keyframes and transitions just to make your work legible.
The Smart, Zero-Edit Alternative
If you don't want to spend your afternoons configuring advanced bitrates, fixing encoding overloads, or wrestling with tedious video editing timelines, you should be letting modern software handle the production for you.
This is why professionals are moving their daily workflows over to Cubix Capture. Instead of leaving you with a flat, hard-to-read video file, Cubix Capture operates as an automated digital director right while you speak:
- Algorithmic Focal Zooming: It completely solves the mobile readability problem. As you move your mouse and click on different application zones, the platform dynamically and smoothly scales up the workspace, guaranteeing your text is crystal clear on any device with zero editing.
- Cinematic Pointer Stabilization: It intercepts the natural, jumpy micro-gestures of your physical trackpad or mouse, translating your trajectory into an elegant, fluid glide that effortlessly steers the viewer’s attention.
- Instant Studio Aesthetics: You don't have to build multi-layered scenes. Cubix Capture automatically frames your target application windows against stunning, dynamic canvas backgrounds and fits your webcam into a pristine floating bubble.
Mastering the advanced matrices of OBS Studio is a vital technical skill if you are launching a complex live-streaming broadcast or capturing high-frame-rate gameplay. But when your core job is to share information, build a professional software tutorial, or guide a client without wasting hours on technical troubleshooting and timeline editing, stepping up to a platform built for automated visual clarity ensures your message is delivered effortlessly.
📖 Keep reading: Fix OBS screen recording lag, how to add a webcam overlay in OBS, and why OBS is overkill for most recordings.
Don’t miss the next one.
Join our newsletter for exclusive tips, product updates, and the latest from the Cubix team.