Imagine this scenario: you just finished recording a flawless ten-minute video walkthrough of a new software platform. You nailed the script, smoothly navigated every menu, and expertly reviewed an on-screen video demo. But when you play the file back, you discover a frustrating glitch—your voice sounds great, but the video demo is completely silent. Or worse, the computer audio was captured perfectly, but your voiceover is entirely missing.
Capturing both your microphone (external voice) and system audio (internal computer sound) simultaneously is the holy grail of screen recording. Whether you are creating a YouTube tutorial, recording a gameplay clip with live commentary, or archiving an interactive Zoom meeting, you need both audio tracks to work in perfect harmony.
Getting your computer to listen to the outside world and its internal digital brain at the same time used to require complex, third-party mixing boards. Thankfully, modern operating systems have made this incredibly simple. Here is the straightforward guide to recording your screen with both audio sources on Windows and Mac.
How to Do It on Windows (Using the Snipping Tool)
If you are running Windows 11, you do not need to download anything. Microsoft updated its native Snipping Tool to handle dual-audio recording beautifully.
- Open your Start Menu, type Snipping Tool, and press Enter.
- Click the Video Camera icon at the top of the window to toggle from screenshot mode to video mode, then click New.
- Click and drag your mouse to highlight the exact box you want to record (or draw it over your entire monitor).
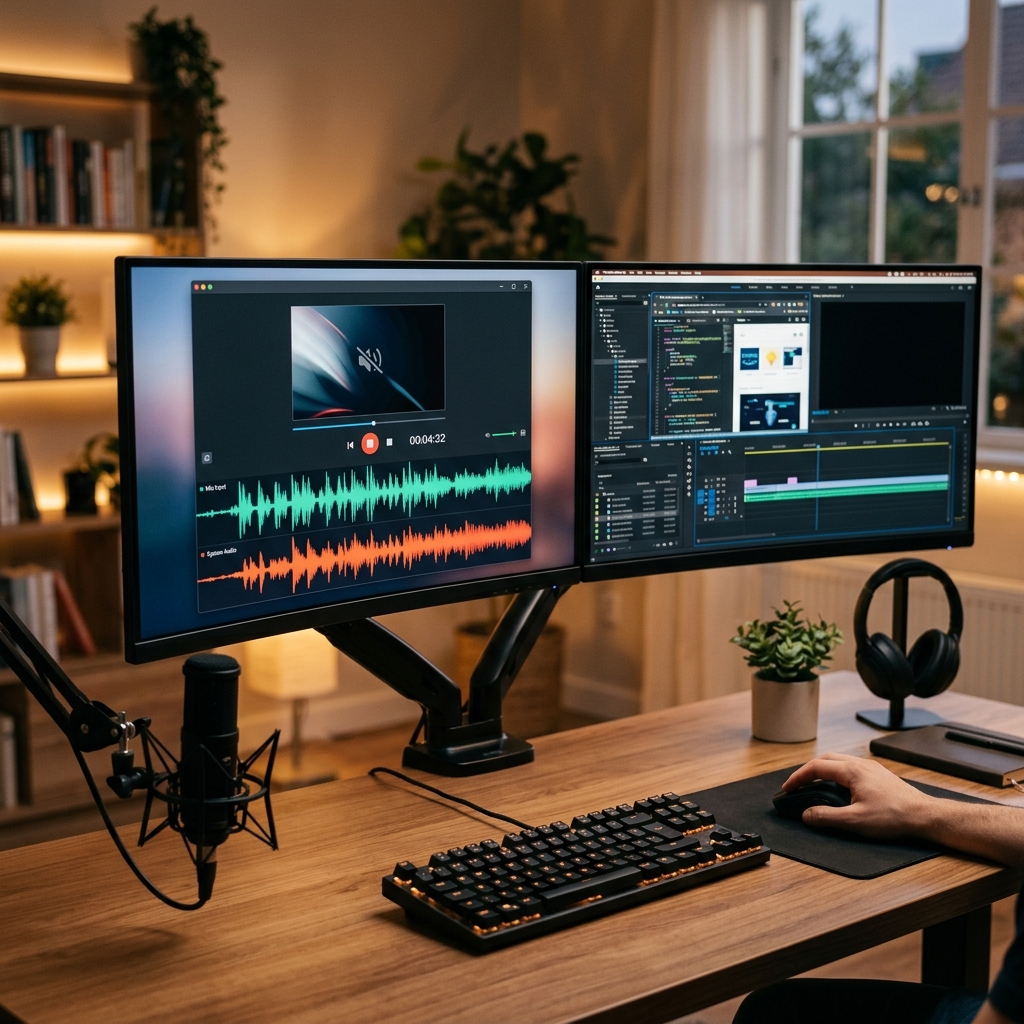
- The Dual-Audio Configuration: Look closely at the top toolbar before you click start. You will see two independent audio icons:
- The Microphone Icon: Click this and ensure it is unmuted to capture your physical voice through your headset or USB mic.
- The Speaker Icon: Click this and ensure it is unmuted to capture internal sounds, music, or video call audio generated by your PC.
- Click Start. When you are finished, click the red stop icon to save your unified MP4 video.
How to Do It on Mac (Using OBS Studio)
Apple’s built-in QuickTime Player can easily record your microphone, but due to strict system-level privacy locks, it cannot natively capture internal system audio without outside help. The most reliable, completely free way to bypass this limitation without hacking your Mac's audio drivers is by using OBS Studio.
- Download and open the free, open-source OBS Studio for Mac.
- In the Sources box at the bottom of the interface, click the (+) icon and select macOS Screen Capture. Name it and click OK.
- In the properties window that pops up, ensure the Method dropdown is set to ScreenCaptureKit (Apple's native framework), and make sure the Capture Audio box is checked. This locks in your system sound.
- Next, go back to the Sources box, click (+) again, and select Audio Input Capture.
- Under the Device dropdown menu, explicitly choose your external microphone or laptop mic, then click OK.
- You will see both volume bars bouncing independently in the Audio Mixer panel. Click Start Recording on the right side of the screen to capture both tracks perfectly.
Enjoying this read?
Get weekly insights on video editing, AI workflows, and creator growth straight to your inbox.
The Hidden Desktop Dilemma: Raw Footage vs. Human Viewing
Configuring your microphone and system audio to record together is a massive technical win. Your video will sound warm, immersive, and completely professional. However, flawless audio is only half of the equation. If your ultimate goal is to share a workflow, teach a lesson, or guide a client, standard raw screen captures still suffer from a critical visual flaw.
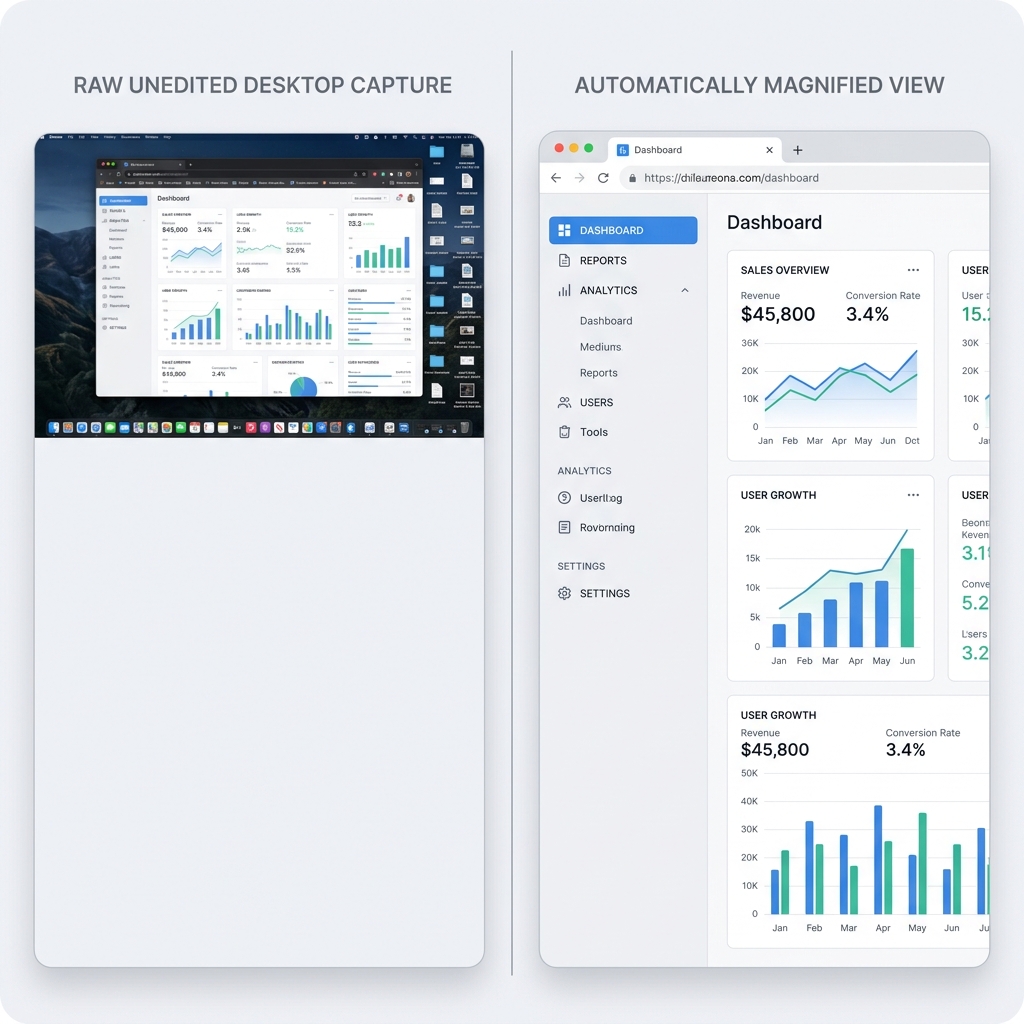
If you record your entire desktop monitor, everything looks perfectly sized to you. But when you share that video file and someone opens it on a smaller laptop display or a smartphone screen, the entire operating system scales down aggressively. The text becomes microscopic, forcing your audience to squint just to read which menus or code blocks you are interacting with.
Furthermore, navigating wishes to standard trackpad or mouse movements naturally translate into jumpy, erratic motion on video playback. A frantic cursor combined with unreadable text creates an exhausting viewing experience, completely undermining the polished audio layout you worked so hard to set up.
📖 Keep reading: how to record your screen with an external microphone, how to record system audio on Mac without BlackHole, and how to fix a screen recording with no audio.
Use This Instead: The Ultimate Multi-Audio Capture Platform
To fix the "tiny text" problem traditionally, you would have to take your dual-audio video file, drop it into heavy post-production software, and spend hours manually keyframing zoom transitions and correcting your mouse path.
A much smarter, frictionless approach is to utilize a platform that automatically engineers a gorgeous visual experience for you while you are speaking.
This is exactly why Cubix Capture completely changes the game for content creators and professionals alike. Instead of forcing you to choose between complicated audio routing or messy, raw video files, Cubix acts as an automated digital director, beautifully polishing your video in real-time:
- Smart Focus Choreography: It completely solves the high-resolution scaling problem. The platform intelligently tracks your on-screen actions and smoothly pans or glides in to magnify your active windows, ensuring text remains perfectly legible on any mobile device.
- Intelligent Audio Levelling: It automatically balances your external microphone track against your internal system audio. If a loud sound effect or notification plays from your computer, the software dynamically dips the system volume so your speaking voice is never drowned out.
- Cinematic Pointer Stabilization: It completely erases the natural shakes and sudden jerks of your physical mouse or trackpad, converting your cursor path into a fluid, elegant sweep that naturally steers the viewer's eye without distraction.
Mastering dual-audio capture using native operating shortcuts or OBS gives you incredible flexibility for everyday recording tasks. But when it is time to deliver an elite tutorial, present an idea to a client, or share a critical digital workflow, upgrading to a platform that guarantees effortless visual and auditory perfection ensures your audience fully absorbs your message.
Don’t miss the next one.
Join our newsletter for exclusive tips, product updates, and the latest from the Cubix team.