Dell laptops are known for being incredibly reliable workhorses. Whether you are using a sleek Dell XPS for creative design, a Latitude for business meetings, or an Inspiron for schoolwork, your computer handles a lot of information every day.
When you need to show a colleague how to fix a software bug or walk a classmate through a complicated assignment, writing a long email is exhausting. A quick screen recording is the fastest, clearest way to get your point across.
But if you are staring at your Dell keyboard wondering where the "Record" button is, do not worry. You do not need to be a tech expert to capture your screen. Here is the straightforward guide to recording your screen on a Dell laptop using the free tools you already have, and how to make sure those videos actually look good.
The Built-In Windows Tools
Since your Dell laptop runs on the Windows operating system, Microsoft has actually hidden two different free screen recorders right inside your computer.
Method 1: The Snipping Tool (Best for Windows 11)
If you bought your Dell recently, you are likely running Windows 11. The Snipping Tool—famous for taking quick pictures of your screen—is now the easiest way to record video.
- Open your Windows Start Menu, type "Snipping Tool," and hit enter to open it.
- Look at the top of the app window and click the Video Camera icon.
- Click the New button. Your screen will dim, allowing you to click and drag your mouse to draw a box around the exact area you want to capture.
- Check the top toolbar to make sure your microphone is unmuted if you want to speak.
- Click Start. When you are done, hit the red stop button, and save the MP4 video file to your computer.
Method 2: The Xbox Game Bar (Best for Single Apps)
If you want to record a single web browser or application quickly without drawing boxes, the Game Bar is a great shortcut.
- Open the application you want to record.
- Press the Windows key + G on your Dell keyboard.
- A dark menu will appear over your screen. Find the "Capture" widget, make sure your microphone is turned on, and click the circular Record button. (Note: The Game Bar cannot record your main desktop or file folders, and will stop recording if you switch to a different application).
The Catch With Dell's Sharp Displays
The Snipping Tool and Game Bar are great for a quick, five-second message. But the moment you try to make a real tutorial or client walkthrough, Dell's biggest selling point starts working against you: the display.
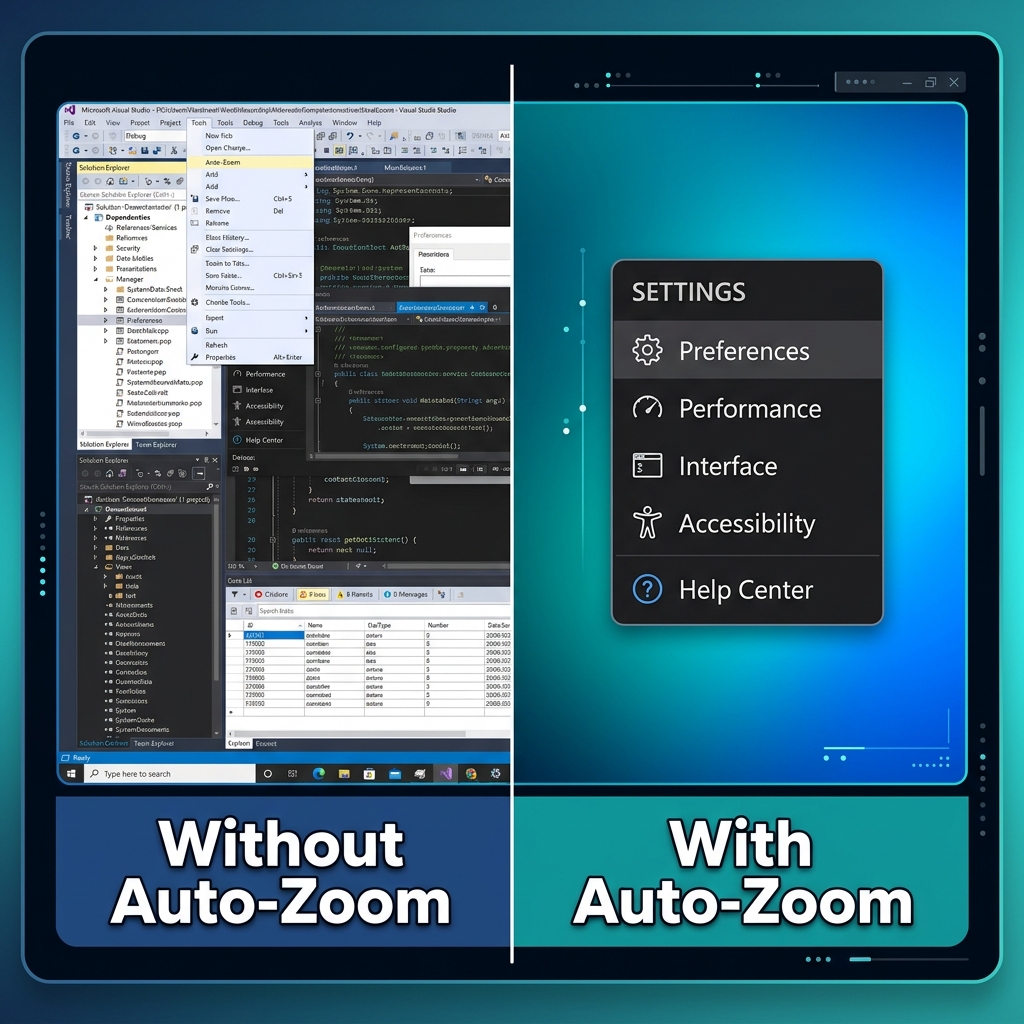
Premium Dell panels, the XPS 13's 3.5K OLED or a UHD+ InfinityEdge screen, pack an enormous number of pixels into a small space. Windows compensates with display scaling (usually 150% or 200%), so everything looks crisp and correctly sized to you. But the recorder captures the screen's full native resolution. When that file plays back on someone's phone or a standard 1080p monitor, the whole interface shrinks and the text that looked perfect on your XPS becomes a microscopic blur.
Quick Dell tip: Before recording a tutorial, open Settings → System → Display and drop your resolution to 1920×1080 (or raise scaling). Your captured menus will be far more legible on the other person's screen. It is a manual fix, but it helps.
On top of that, nudging the Dell precision trackpad produces tiny, jittery cursor hops that look frantic on video. A viewer who has to squint at the text and chase a shaky pointer rarely makes it to the end.
The Effortless Upgrade for Dell Users
The manual scaling trick helps, but it cannot follow your mouse or smooth your cursor. To get a genuinely readable, professional result without learning a video editor, you want a recorder that handles the framing for you while you talk.
That is what Cubix Capture does on your Dell. Rather than saving one flat, zoomed-out file, it directs the shot in real time:
- Auto-zoom that follows your work: It detects where you are clicking and pushes in smoothly, so the resolution-scaling problem above never reaches your viewer, every menu lands close-up and readable.
- Cursor smoothing: The jittery hops from the precision trackpad are ironed into one calm, deliberate motion.
- Clean webcam backgrounds: Turn on your camera and it lifts you off your real background and onto a tidy one, no green screen required.
Built-in Windows shortcuts are perfectly fine for a throwaway clip. But the same auto-zoom approach works on any Windows machine, see our guides for HP laptops and Lenovo ThinkPads, or the full Windows 11 screen recording walkthrough. For anything you actually want people to watch to the end, let the recorder do the framing.