Whether you are saving a digital receipt, capturing a visual reference for a design project, or grabbing a mockup to send to a teammate, taking a screenshot is one of the most fundamental daily tasks on any computer — and macOS happens to ship with one of the most capable built-in screenshot engines ever made.
The catch? Almost nobody uses more than one or two of its features. Most Mac users press Command + Shift + 3, dig the file off a cluttered desktop, and call it a day — completely unaware that the same machine can capture a single window with a perfect drop shadow, copy straight to the clipboard, set a timer for disappearing menus, or change where every screenshot is saved.
This is the complete, no-stone-unturned guide to every screenshot method on macOS in 2026. If you just switched from a PC and want the fastest possible answer, start with our quick guide to how can I screenshot on Mac — or grab the condensed, pin-it-by-your-desk Mac screenshot shortcut cheat sheet — then bookmark this page for when you want to truly master it.
The Three Shortcuts That Matter Most
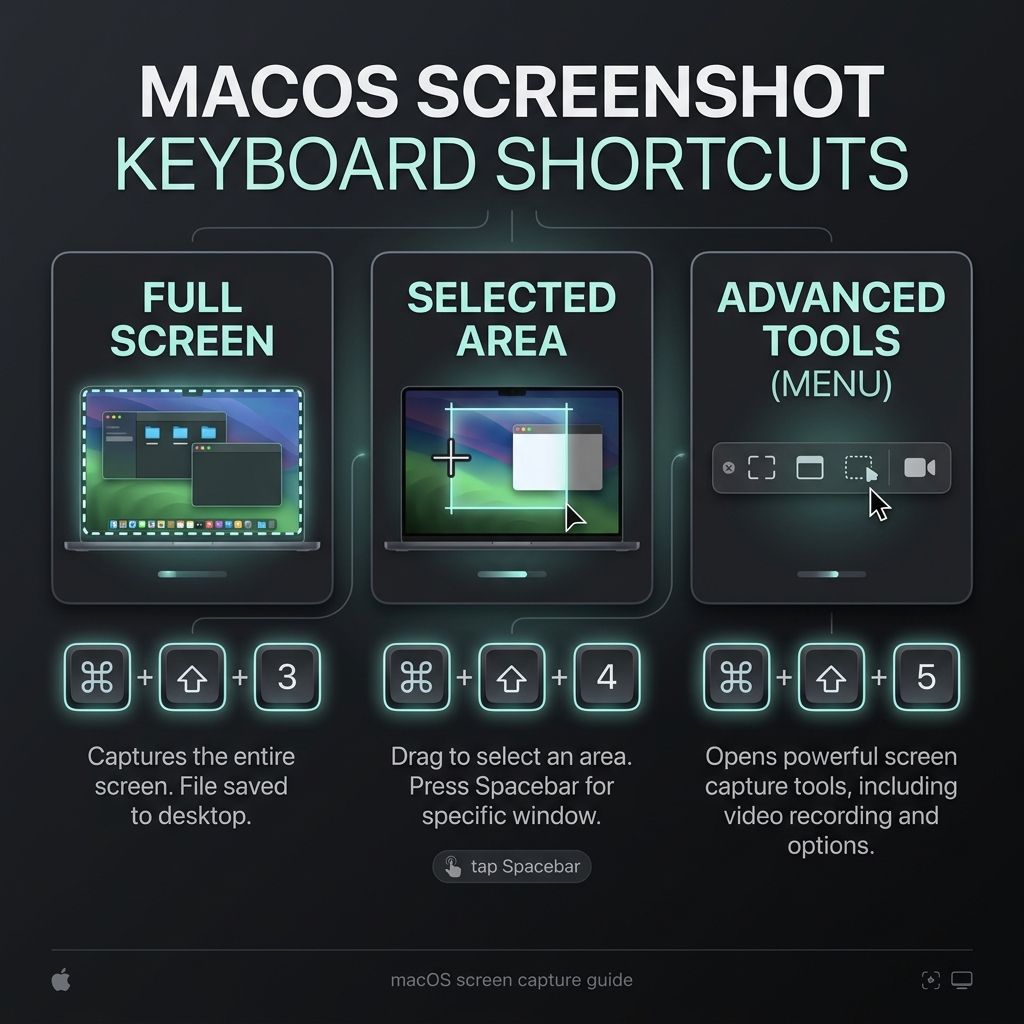
Before the deep dive, here is the entire macOS screenshot system distilled into three muscle-memory shortcuts. Learn these and you've already beaten 95% of Mac users:
Command + Shift + 3— capture the whole screen instantly.Command + Shift + 4— capture a selected area with a crosshair.Command + Shift + 5— open the full capture toolbar (screenshots and screen recording).
Now let's break each one down, then unlock the modifier keys and settings most people never touch.
1. Capture the Entire Screen
The Shortcut: Command + Shift + 3
This is the fastest, most basic method. If you need everything visible on your display right this second — across every monitor if you run more than one — this is the shortcut.
- Press all three keys simultaneously.
- You'll hear a camera shutter sound (if your volume is up).
- A floating thumbnail appears in the bottom-right corner for a few seconds. Click it to mark it up immediately, drag it straight into an email or Slack, or ignore it and it saves automatically.
If you have two or three displays connected, macOS saves a separate image file for each screen — so you get clean, full-resolution captures instead of one stretched panorama.
2. Capture a Specific Selection
The Shortcut: Command + Shift + 4
You rarely need a picture of your entire desktop. To grab one paragraph, a single UI element, or an image from a webpage, this is the tool you'll reach for 90% of the time.
- Press the shortcut and your cursor becomes a crosshair showing live pixel coordinates.
- Click and drag a box over the exact area you want.
- Release your mouse or trackpad to take the shot.
Pro-tips while dragging: Hold the Spacebar mid-drag to move the entire selection box without resizing it. Hold Shift to lock one edge and resize only the height or width. Hold Option to resize symmetrically from the center. Press Esc at any time to cancel.
3. Capture a Clean, Specific Window
The Shortcut: Command + Shift + 4, then the Spacebar
This is the hidden gem of Mac screenshots. To capture a single app window — a browser, a Finder window, a Slack thread — without manually tracing its edges, let macOS do it for you.
- Press
Command + Shift + 4to bring up the crosshairs. - Tap the Spacebar — the crosshairs become a small camera icon.
- Hover over any open window (it highlights in blue) and click.
The magic feature: macOS captures the window with a polished drop shadow and a transparent background — instantly "presentation ready."
- Want it without the drop shadow? Hold down the Option key while you click. This also crops out the surrounding transparent padding for a tight, edge-to-edge window.
This same trick works on the menu bar, the Dock, and open dropdown menus — just hover and click to grab only that element.
4. The Master Control Panel
The Shortcut: Command + Shift + 5
Can't remember the rest? This is the only shortcut you truly need. It summons a floating toolbar with every capture option in one place.
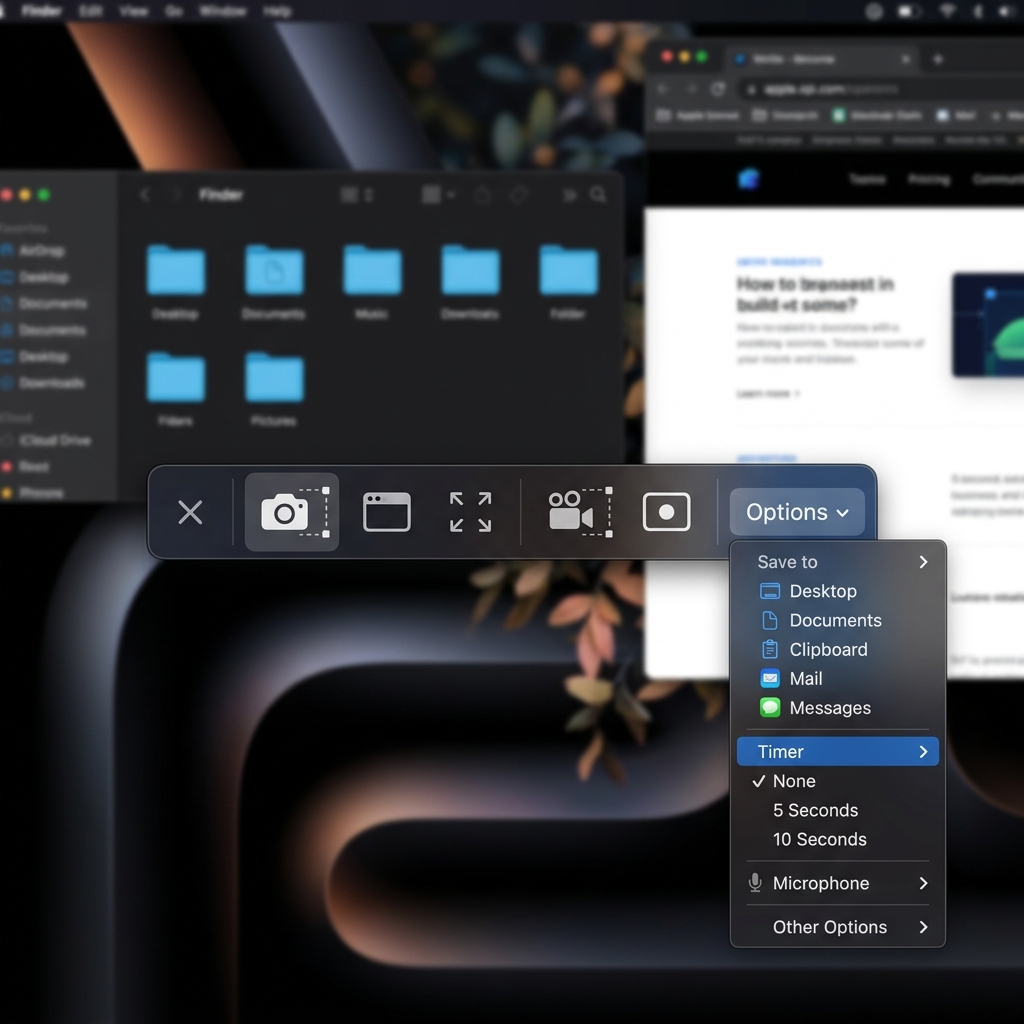
From left to right, the toolbar lets you:
- Capture the entire screen.
- Capture a selected window.
- Capture a selected portion.
- Record a video of your entire screen.
- Record a video of a selected portion.
Those last two options are the moment many people outgrow screenshots entirely. macOS's built-in recorder captures raw footage, but it won't zoom, frame, or polish anything for you — that's exactly the gap Cubix Capture fills, turning a plain screen recording into an auto-zoomed, cinematic walkthrough with no editing.
The "Options" Menu Is Where the Real Power Lives
Click Options on that toolbar and you control settings most Mac users don't know exist:
- Save to: Desktop, Documents, Clipboard, Mail, Messages, Preview, or any custom folder.
- Timer: None, 5 seconds, or 10 seconds — essential for capturing dropdown menus, tooltips, and hover states that vanish the moment you click away.
- Show Floating Thumbnail: toggle the corner preview on or off.
- Show Mouse Pointer: include or hide the cursor in the final image.
- Remember Last Selection: reuse the exact same capture region every time — perfect for repeatable documentation.
Enjoying this read?
Get weekly insights on video editing, AI workflows, and creator growth straight to your inbox.
The Clipboard Trick (Stop Cluttering Your Desktop)
By default, macOS saves every screenshot as a .png file directly to your Desktop. Take a dozen a day and by Friday your desktop is unusable.
If you're only grabbing an image to paste straight into Slack, a Google Doc, or an email, add the Control key to any shortcut above:
Command + Control + Shift + 4
Instead of writing a file, macOS copies the image to your invisible clipboard. Hit Command + V to paste it exactly where you need it — and your hard drive stays clean.
Power Settings Most People Never Touch
Change Where Screenshots Save
Open the capture toolbar with Command + Shift + 5, then choose Options → Save to → Other Location and pick a dedicated "Screenshots" folder. Every future capture lands there automatically — no more desktop chaos.
Change the File Format
PNG is crisp but heavy. To switch to smaller JPGs (or PDF, TIFF, HEIC), open Terminal and run one command, swapping in your format of choice:
defaults write com.apple.screencapture type jpg && killall SystemUIServer
Replace jpg with png, pdf, tiff, or heic whenever you like.
Annotate Instantly with Markup
Click the floating thumbnail right after capturing and the built-in Markup editor opens. Add arrows, shapes, text, highlights, your signature, or a crop — then save or share without ever opening a separate app. It's the fastest way to circle "the button is here" before sending it to a teammate.
Troubleshooting: When Mac Screenshots Stop Working
- No shutter sound, nothing happens? Check System Settings → Keyboard → Keyboard Shortcuts → Screenshots and confirm the shortcuts are enabled and not hijacked by another app.
- Can't find the file? It may be set to save to the Clipboard or a custom folder — re-check the Options menu above.
- Capture comes out black or blocked? Some apps (streaming video, DRM-protected content) intentionally block screenshots. That's by design, not a bug.
Going Beyond the Static Image
You now know more about Mac screenshots than almost anyone you'll meet. But here's the honest truth for 2026: a static image often isn't enough.
If you catch yourself taking five separate screenshots and drawing red arrows all over them just to explain one workflow to a coworker or client, you're working too hard — and the result still isn't clear. That's the exact moment to switch from capturing images to capturing motion. (Not sure which you actually need? Here's the difference between screen recording vs. screen capture.)
When you're ready to graduate from static screenshots and start creating breathtaking, auto-zoomed, cinematic walkthroughs of your screen — without ever opening a video editor — explore Cubix Capture. And if you bounce between platforms, keep our master guide to screenshots on any device close by.
Don’t miss the next one.
Join our newsletter for exclusive tips, product updates, and the latest from the Cubix team.