You just booked a flight and want to save the QR code. You spotted a hilarious meme on Instagram and need it in the group chat. You bought concert tickets and want a digital receipt in case the app crashes.
Taking a screenshot on your iPhone is a daily reflex — but Apple has quietly made it a moving target. As the iconic Home Button disappeared and displays went edge-to-edge, the exact buttons you press now depend entirely on which model is in your hand. Press the wrong combo and you'll lock the screen or trigger the power-off slider instead.
This guide covers every iPhone (and iPad) layout, where your screenshots actually go, and a few genuinely useful tricks — like turning the back of your phone into a screenshot button — that most people never discover. If you also switch between devices, keep our master guide to taking a screenshot on any device handy.
First, Which iPhone Do You Have?
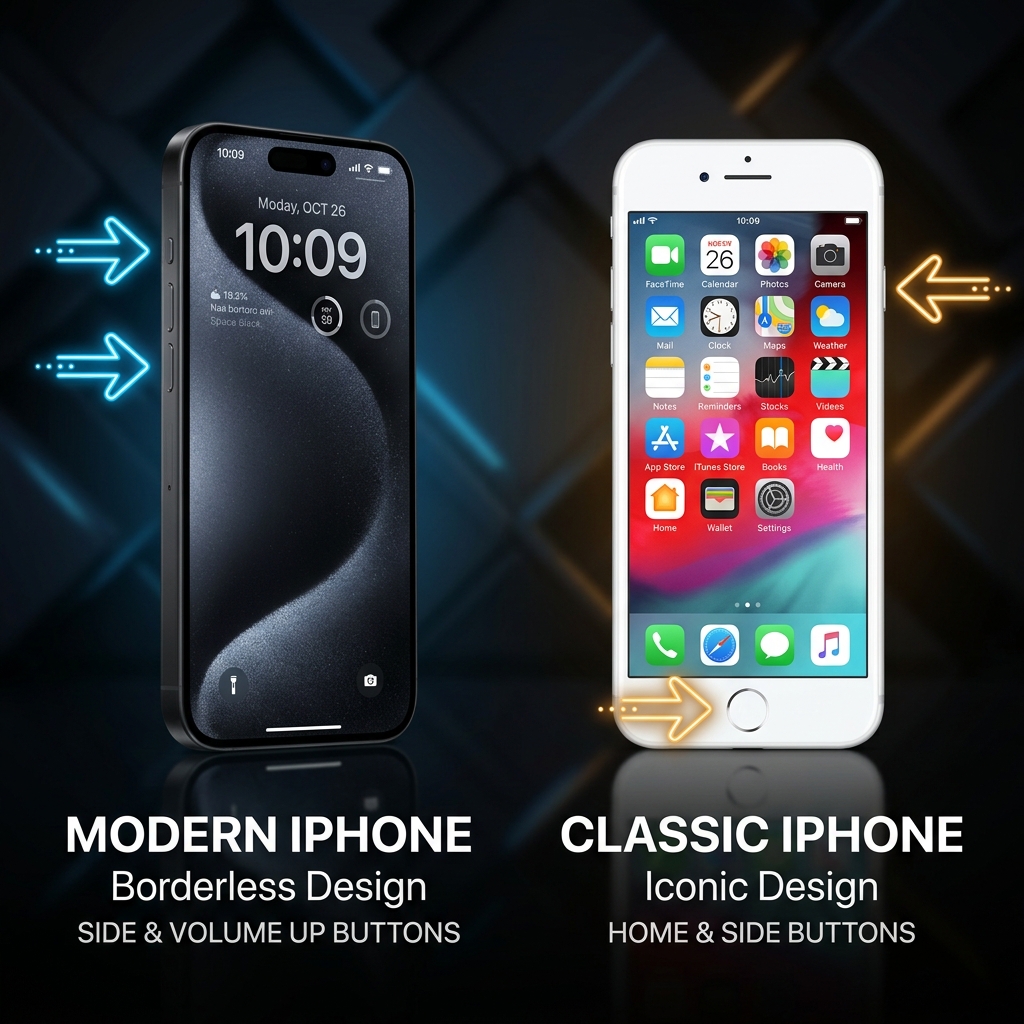
There are only two layouts that matter, and they map cleanly to a single question — does your iPhone have a Home button?
- No Home button (Face ID): iPhone X and every model since — the 11, 12, 13, 14, 15, and 16 series, plus the Pro and Pro Max variants.
- Home button (Touch ID): the iPhone SE (all generations), iPhone 8 and earlier.
Once you know which camp you're in, the method below is muscle memory in a day.
Method 1: iPhones with Face ID (No Home Button)
If you are using a modern iPhone with a notch or the Dynamic Island (iPhone X, 11, 12, 13, 14, 15, or 16 series), Apple moved the screenshot function entirely to the side buttons.
How to do it:
- Press the Side button (on the right side of the phone) and the Volume Up button (on the left side) at the exact same time.
- Quickly release both buttons.
- Your screen will flash white, and you will hear a camera shutter sound (if your phone is not on silent).
Method 2: iPhones with Touch ID (Physical Home Button)
If you are using an iPhone SE, an iPhone 8, or any older model that still has the circular Home Button at the bottom of the screen, the method relies on that classic button.
How to do it:
- Press the Side button (or the Top button on very old models) and the Home button at the exact same time.
- Quickly release both buttons.
- Your screen will flash, confirming the capture.
What to Do with the "Thumbnail"
Regardless of which iPhone you use, immediately after taking a screenshot, a small thumbnail preview will pop up in the bottom-left corner of your screen. You have three options:
- Do Nothing: If you wait about five seconds, the thumbnail will automatically slide off the screen and save the image directly to your Photos app. You can also physically swipe it to the left to dismiss it faster.
- Share Instantly: Tap and hold the thumbnail. A menu will pop up allowing you to instantly AirDrop it or send it in a text message without saving it to your camera roll permanently.
- Markup and Edit: Tap the thumbnail once. This opens the Markup editor where you can crop the image, draw red circles around specific text, or use the highlighter tool before saving or sending it.
The Secret "Pro" Methods
If pressing physical buttons feels clunky, or if you need to capture a massive webpage, iOS has two incredible hidden features built right in.
1. The "Back Tap" Screenshot
You can actually program the back of your iPhone to act as a secret touch-sensitive button.
How to set it up:
- Go to Settings > Accessibility > Touch.
- Scroll all the way down and tap Back Tap.
- Select Double Tap (or Triple Tap) and choose Screenshot from the list. Now, whenever you firmly double-tap the Apple logo on the back of your phone, it will instantly take a screenshot.
Enjoying this read?
Get weekly insights on video editing, AI workflows, and creator growth straight to your inbox.
2. The "Scrolling" Full-Page Screenshot
If you are reading a long article on Safari or looking at a recipe and want to capture the entire page, you do not need to take five separate screenshots.
How to do it:
- Open Safari and take a standard screenshot.
- Quickly tap the thumbnail in the bottom-left corner to open the editor.
- At the very top of the screen, tap the Full Page tab.
- You will now see a scrollbar on the right side showing the entire webpage. When you tap "Done," it will save the entire scrolling page as a single, high-quality PDF file in your Files app.
Where Do iPhone Screenshots Go?
By default, every screenshot lands in your Photos app. Apple automatically files them into a dedicated Screenshots album (open Photos → Albums → scroll to Media Types → Screenshots), so you can find them without scrolling through your whole camera roll. They sync to iCloud Photos like any other image, which means a screenshot you grab on your iPhone shows up on your iPad and Mac moments later.
Silence the Shutter Sound (and Other Settings)
That loud camera-click can be awkward in a quiet meeting. iPhone ties the screenshot sound to your ringer, so just flip the Ring/Silent switch to silent (or turn the volume all the way down) and screenshots capture silently. If your iPhone uses the newer customizable Action Button, you can even assign it to trigger a screenshot.
On an iPad It's Almost Identical
iPads follow the same logic: models with Face ID use Top button + Volume Up, while older Home-button iPads use Top button + Home button. If you have an Apple Pencil, swipe up diagonally from either bottom corner of the screen to grab a screenshot and jump straight into Markup.
Need Motion Instead of a Still? Record It
Sometimes a process has too many steps for a single image. iPhone has a built-in screen recorder — add it from Settings → Control Center, then tap the record button in Control Center. (Switching between an iPhone and a computer? Here's how the same idea works on Mac and Android, and the difference between screen recording vs. screen capture.)
Upgrade Your Desktop Presentations
A quick iPhone screenshot is perfect for a meme or a boarding pass. But the moment you sit down at your Mac or Windows PC to explain a workflow, demo a software feature, or record an onboarding tutorial, static images and raw, unedited recordings stop being enough.
When you're ready to graduate from clunky desktop captures and start instantly generating breathtaking, auto-zoomed, cinematic video walkthroughs — without ever touching a video editing timeline — explore Cubix Capture.
Don’t miss the next one.
Join our newsletter for exclusive tips, product updates, and the latest from the Cubix team.