Recording your screen used to be a highly technical task. Today, it is just another part of everyday communication. Whether you need to walk a client through a new software platform, show a student how to solve a digital equation, or present a weekly report to your remote team, capturing your screen is often the fastest way to share information.
If you use an Apple computer, you immediately face a common question: should you just use the free tools that come with macOS, or is it worth finding a dedicated third-party software?
Understanding the difference between a built-in screen recorder on Mac and a third-party application will save you hours of frustration. Here is a clear, straightforward breakdown to help you decide which recipe is right for your specific needs.
The Built-In Mac Tool: The Quick, Everyday Fix
Apple is famous for making things simple, and their native screen capture tool is no exception. By simply pressing Command + Shift + 5 on your keyboard, a sleek little menu appears at the bottom of your screen, ready to record.
Why it works:
- It is Instant: There is nothing to download, install, or set up.
- It is Simple: You just drag a box over the area you want to record, ensure your microphone is selected, and click start.
- It is Perfect for Internal Use: If you just need a ten-second video to show a coworker an error message on a website, this tool gets the job done instantly.
Where it falls short: The built-in Mac screen recorder is essentially just a security camera for your computer screen. It captures exactly what happens, flaws and all. If your trackpad makes your mouse cursor jump around erratically, the video captures that. If your 16-inch screen makes text look microscopic on a viewer's mobile phone, the video captures that, too.
It provides the raw video, but it does absolutely nothing to make that video easy to watch.
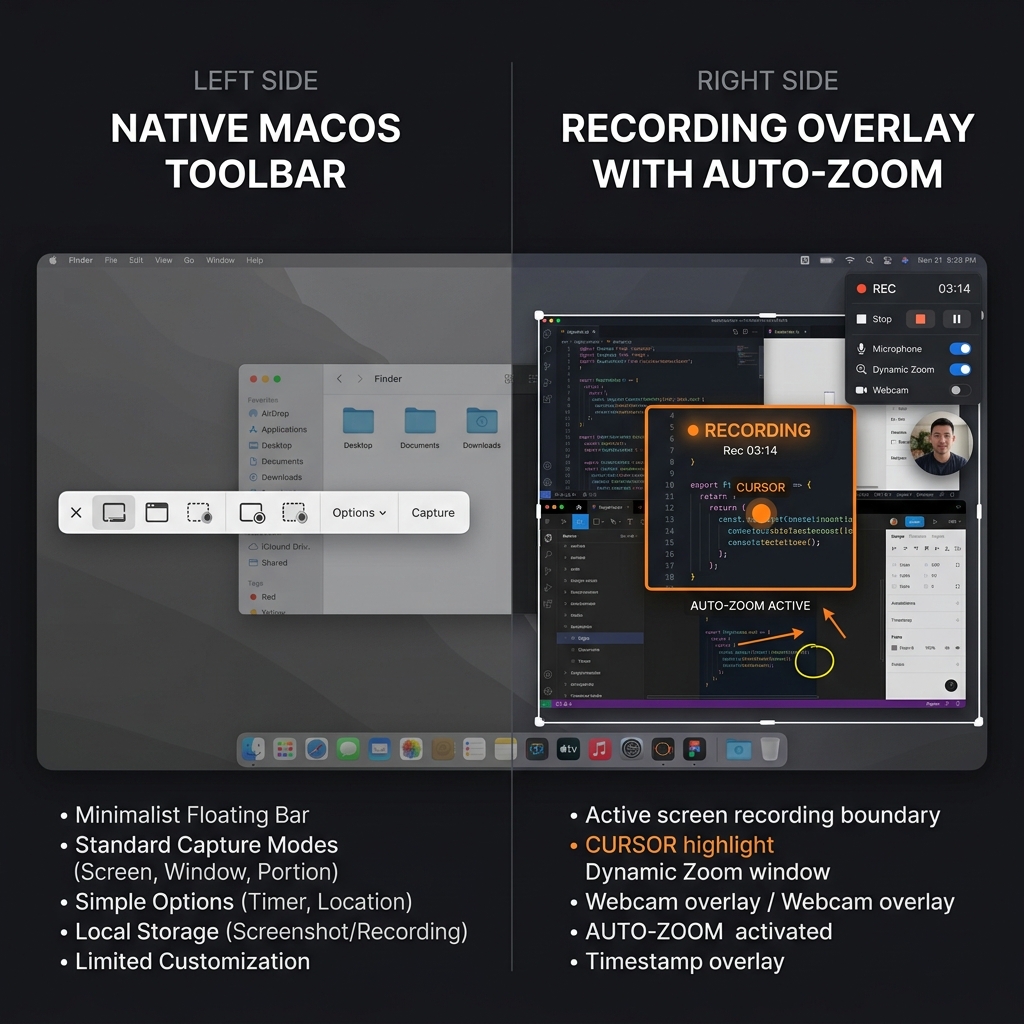
Built-In vs. Third-Party: Side by Side
Before the verdict, here is the honest trade-off in one view:
| Capability | Built-in (Command + Shift + 5) | Third-party recorder |
|---|---|---|
| Setup time | Instant, nothing to install | One-time download |
| Cost | Free | Free tier or paid |
| System (internal) audio | Needs a separate driver | Usually built in |
| Auto-zoom on clicks | No | Yes |
| Cursor smoothing | No | Yes |
| Webcam background cleanup | No | Yes |
| Best use | Quick internal clips | Tutorials, demos, courses |
The pattern is clear: the built-in tool wins on speed and simplicity, while a third-party tool wins on how the finished video looks to someone else. The right answer is not "always upgrade", it is matching the tool to the audience.
Enjoying this read?
Get weekly insights on video editing, AI workflows, and creator growth straight to your inbox.
The Third-Party Application: The Professional Recipe
If the video you are recording is meant to teach, impress, or solve a real problem for someone else, the raw footage provided by the built-in tool is rarely enough. Viewers lose attention quickly when they have to squint to read text or follow a nervous, jittery mouse pointer.
When you move to a third-party screen recorder, you are no longer just capturing a video; you are creating an experience. The recipe for a truly helpful tutorial requires three main ingredients that basic tools cannot provide:
- Visual Focus: The audience needs to see exactly what you are doing. The screen should naturally zoom in on important clicks so the viewer never feels lost.
- Smooth Navigation: The mouse pointer should guide the eye smoothly, rather than darting around the screen in a distracting way.
- A Clean Environment: If you are speaking to the camera, your physical background should be clean and professional, keeping the focus entirely on your message.
Achieving this with standard built-in tools means you have to record the video, open a heavy video editing program, and spend hours manually adding zoom effects and cropping your footage.
The Verdict: Which Should You Choose?
The choice between a built-in screen recorder and a third-party option comes down to your audience. If the video is a quick, disposable message for a colleague, use the built-in Mac shortcut.
But if you are creating a permanent tutorial, a product demonstration, or an educational guide, a third-party tool is essential. And you do not have to choose a tool that requires a degree in video editing to use.
This is where Cubix Capture bridges the gap beautifully. It is a third-party screen recorder designed to give you professional, edited results automatically, without the extra work.
While you focus on presenting your real-life solutions, the software handles the visual presentation:
- Auto-Zoom: It intelligently tracks your actions, automatically zooming in on the important areas of your screen so viewers on any device can see perfectly.
- Smooth Cursor: It removes all the messy trackpad jitters, creating a calm, professional cursor movement that guides your audience effortlessly.
- Live Backgrounds: It instantly masks out your messy room and applies a clean, distraction-free background to your webcam feed.
Using the built-in Mac screen recorder is a great starting point. But when you are ready to stop making basic recordings and start creating clear, engaging, human-centric videos that truly help your viewers, upgrading to a smart third-party tool is the exact solution you need.
Related reading:
- Best Free Screen Recorder for Mac in 2026
- How to Record Screen on Mac: Built-In and Better Alternatives
- How to Screen Record on Mac without QuickTime
Don’t miss the next one.
Join our newsletter for exclusive tips, product updates, and the latest from the Cubix team.