You can feel it the second you stop recording.
The screen recorder did its job. It captured the pixels. Your microphone worked. The cursor moved. The app loaded. Technically, nothing failed.
And yet the video still feels unfinished.
You open the file and immediately notice the same problems every founder, educator, support lead, and product marketer notices after recording a software walkthrough:
- the UI is too small on mobile
- the cursor is hard to follow
- the important click is buried in a full desktop capture
- the browser chrome, bookmarks, and menu bars create visual clutter
- the viewer has to guess where to look
- the recording feels like evidence, not a presentation
That is why so much modern screen recording still feels like 2023. The tools have become faster, cloudier, and easier to share, but the core mental model has barely changed: capture the screen first, make it understandable later.
For a casual bug report, that can be enough. For a product demo, software tutorial, onboarding video, course lesson, investor update, or launch clip, it is not.
The next generation of screen recording is not just about recording more pixels. It is about recording intent.
The Hidden Problem: Most Screen Recorders Capture Pixels, Not Attention
Traditional screen recording software is built around passive capture.
OBS, QuickTime, Game Bar, basic browser recorders, and many lightweight screen recorder apps all start from the same assumption: whatever appears on your monitor should be recorded as-is.
That sounds reasonable until you remember what a viewer actually needs.
A viewer does not need your entire desktop. They need to know:
- what changed
- where you clicked
- which button matters
- what field you typed into
- why this part of the interface matters now
- what they should pay attention to next
The gap between those two things is the gap between screen capture and screen communication.
Passive screen capture records everything equally. A primary CTA, a browser extension icon, a notification badge, the menu bar, and your cursor all get the same visual weight. The recorder has no idea that one pixel region contains the story and another is just noise.
That is why raw screen recordings often feel technically correct but emotionally weak. They show the product, but they do not guide the viewer.
Why Raw Screen Recordings Fail on Mobile
The most obvious failure is mobile readability.
A founder records a SaaS dashboard on a 27-inch monitor. The dashboard looks great while recording because the founder is sitting inches away from the display. Then the same video gets embedded on a landing page, posted on LinkedIn, sent in a sales email, or watched inside a Slack preview.
Suddenly the app becomes a postage stamp.
This is not a minor design issue. It changes whether the viewer understands the product at all.
If the viewer cannot read the field label, button text, navigation item, table row, or modal state, the demo stops being persuasive. The viewer may still hear the narration, but the visual proof is gone. The product becomes abstract.
That is why product demos recorded with a generic screen recording program often underperform. The software may be excellent, but the video makes it look dense, complicated, or hard to use.
For related demo strategy, read The Complete Guide to Recording Product Demos and How to Record a Software Tutorial in Under 10 Minutes.
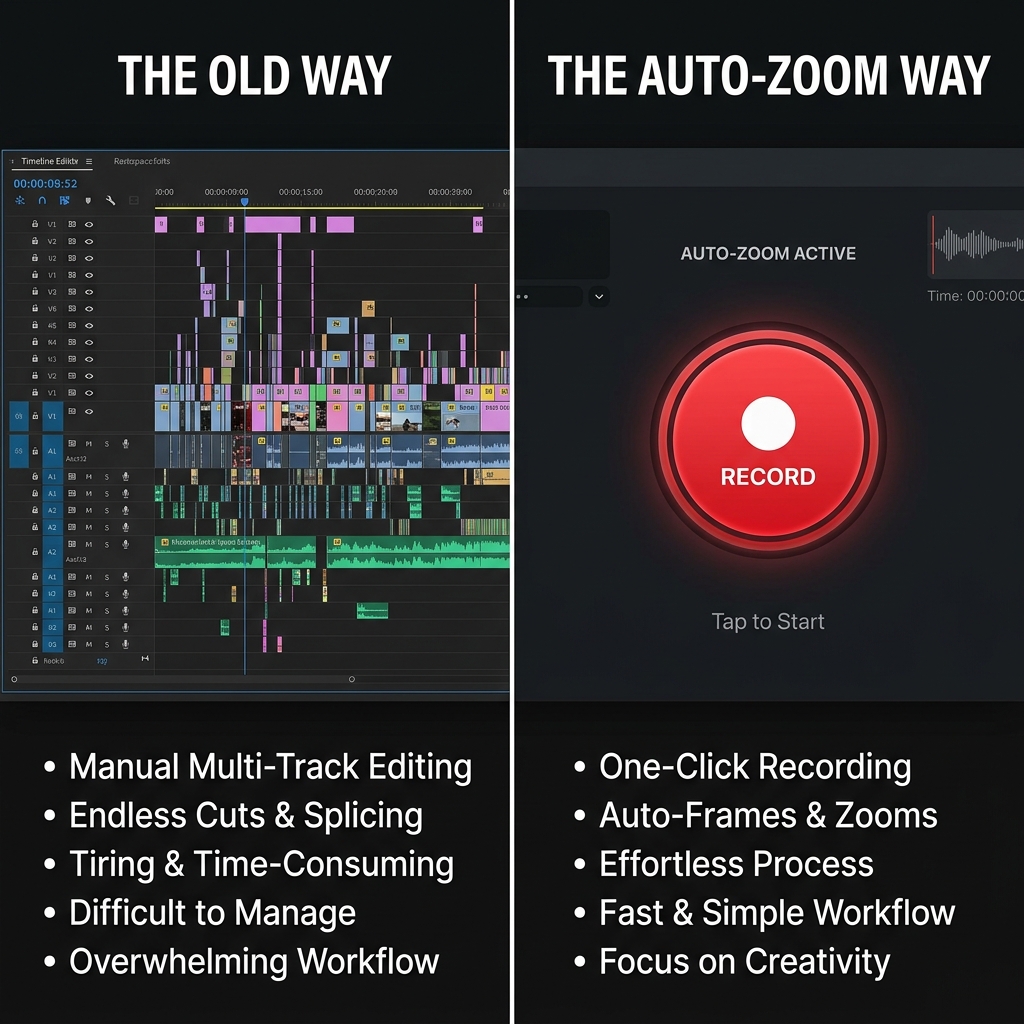
The 2023 Workflow: Record First, Repair Later
The old workflow looks like this:
- Record the full screen.
- Watch the video back.
- Notice the UI is too small.
- Import the recording into a video editor.
- Add zoom keyframes around important clicks.
- Pan the frame to follow the mouse.
- Crop out distracting browser and desktop elements.
- Smooth cuts and transitions.
- Export a new version.
- Watch it again and fix the awkward parts.
This is why a three-minute tutorial can quietly turn into a one-hour editing session.
The real problem is not that editing exists. Editing is powerful when you are shaping a story. The problem is that basic screen recorders force you to use editing software just to make the recording legible.
Manual zoom keyframes are not creative work. They are corrective work. You are compensating for the recorder's lack of context.
What Auto-Zoom During Recording Actually Means
Auto-zoom during recording is often misunderstood.
It is not just a fancy zoom effect. It is a different approach to screen recording.
A screen recorder with auto zoom watches the relationship between your cursor, clicks, scrolls, and the active window. Instead of treating every part of the screen as equally important, it uses your interactions as a signal for viewer attention.
When you click a button, open a dropdown, type into a field, or move through a workflow, the recorder can frame the relevant area more tightly. The result is a screen recording where the important part becomes readable at the exact moment the viewer needs it.
This matters because attention is temporal. A viewer does not need the whole interface enlarged forever. They need the right detail enlarged at the right moment.
That is the difference between a crude crop and a useful auto-zoom screen recorder.
The Three Layers of a Modern Screen Recording
The best screen recording software for demos and tutorials does not stop at zoom.
It combines three layers.
1. Framing
Framing determines what the viewer sees.
In a raw recording, the frame is usually the full monitor. In a modern software tutorial, the frame should follow the action: a button, a form field, a sidebar, a menu, a modal, a code block, or a product state.
Good framing makes text readable. Great framing makes the next step obvious.
2. Motion
Motion determines whether the viewer can follow the transition.
If the camera jumps abruptly from one area to another, the video feels chaotic. If the cursor is jittery, the software feels harder to use than it really is. Smooth motion makes a product feel calmer, clearer, and more intentional.
This is where cursor smoothing matters. A screen recorder with cursor smoothing does not just capture your hand movement; it translates it into motion that feels better for the viewer.
3. Staging
Staging determines how premium the recording feels.
A raw desktop recording includes everything: tabs, bookmarks, menu bars, notifications, background clutter, and inconsistent margins. A staged recording isolates the product and places it in a clean visual environment.
That is why live backgrounds and app-window framing are not cosmetic. They remove noise. They make the viewer feel like the product is being presented, not accidentally exposed.
Enjoying this read?
Get weekly insights on video editing, AI workflows, and creator growth straight to your inbox.
Why This Is Hard to Build
On paper, auto-zoom sounds simple: follow the cursor.
In practice, it is much harder.
A real auto-zoom screen recorder has to understand screen coordinates, input events, window bounds, monitor scaling, cursor position, recording resolution, export aspect ratio, and motion timing. It also has to do all of that without making the recording lag.
The Windows Problem
Windows recording is messy because Windows hardware is messy.
One user may have a 4K monitor scaled at 150 percent next to a 1080p monitor scaled at 100 percent. Another may record from a laptop display and drag windows between screens. Another may use fractional scaling, high refresh rates, external webcams, and multiple audio devices.
For a recorder to zoom to the right place, it has to map physical pixels, logical pixels, window coordinates, and cursor coordinates correctly. If it gets that mapping wrong, the zoom lands slightly off target, which feels worse than no zoom at all.
That is why dedicated Windows pages like Free Screen Recorder for Windows matter: Windows screen recording is not just Mac recording with a different download button.
The Mac Problem
Mac screen recording has a different set of constraints.
macOS is strict about screen recording permission, accessibility permission, camera access, microphone access, and system audio. Modern capture APIs are powerful, but a polished recorder still has to be careful about privacy prompts, performance, battery usage, and Apple Silicon optimization.
A good screen recorder for Mac has to feel native. If the recorder drains battery, misses clicks, or creates permission confusion, the workflow breaks.
Why Auto-Zoom Helps Tutorials
Tutorial viewers are not watching for entertainment. They are trying to complete a task.
That makes clarity the product.
In a tutorial, the viewer needs to know exactly where to click, what to type, and what state the software should be in after each step. Auto-zoom helps because it reduces the amount of visual interpretation required.
Instead of scanning a full desktop, the viewer follows the action.
This is especially important for:
- onboarding tutorials
- help docs
- customer support walkthroughs
- internal SOP videos
- course lessons
- developer tool demos
- product education content
If your tutorial involves dense UI, forms, dashboards, code, analytics, settings pages, or admin panels, raw screen capture is usually not enough.
Why Auto-Zoom Helps Product Demos
Product demos have a different job.
A tutorial helps someone complete a task. A demo helps someone believe the product is valuable.
That means the recording needs to do more than show steps. It has to create confidence.
When the viewer sees a polished product demo with readable UI, smooth motion, and a focused frame, they subconsciously assume the product is equally polished. When they see a cluttered raw desktop recording, they may assume the product is rough even if the product itself is excellent.
This is why founders and growth teams should treat demo recording as conversion design, not just video capture.
For the business-side version of this argument, read The Expensive Mistake Most Founders Make With Product Demos & Onboarding Videos.
The Future Is Presentation Capture
The next phase of screen recording is presentation capture.
Presentation capture means the recorder understands that the final output is not just a file. It is a communication asset.
That asset might become:
- a landing page hero demo
- a launch video
- a help center tutorial
- an onboarding sequence
- a sales follow-up
- a changelog clip
- a customer support reply
- a course lesson
Each of those assets needs focus, pacing, clarity, and polish. They should not require a full video editing workflow every time.
This is the reason tools like Cubix Capture exist. The point is not to replace advanced video editors for complex productions. The point is to remove the unnecessary editing that exists only because traditional screen recorders capture passively.
What to Look For in a Modern Screen Recorder
If you are choosing screen recording software for product demos, tutorials, or onboarding videos, look for these capabilities:
- auto zoom on clicks and important actions
- smooth cursor rendering
- webcam overlay
- microphone and system audio capture
- app-window recording
- clean backgrounds or presentation frames
- Windows and Mac support
- fast export
- readable output on mobile
- minimal editing after recording
Notice what is not on that list: a million settings.
For most teams, the best screen recorder is not the one with the most knobs. It is the one that produces the clearest video with the fewest decisions.
The Real Fix
The reason most screen recorders still feel like 2023 is not that they fail to record.
They fail to direct.
They leave attention, framing, motion, and polish to the person who already did the hard work of explaining the product. Auto-zoom during recording fixes that by turning the recorder into an active part of the communication process.
You still record naturally. You still click through your product. You still explain the workflow in your own words.
But the output no longer feels like raw evidence. It feels like a guided presentation.
That is the leap.
If you want to try that workflow, start with Cubix Capture. If you are comparing by platform, the dedicated Windows screen recorder, Mac screen recorder, and screen recorder with audio pages explain the practical differences.
Don’t miss the next one.
Join our newsletter for exclusive tips, product updates, and the latest from the Cubix team.