You have just finished explaining a complex process. You spoke clearly, navigated your screen perfectly, and clicked the stop button with a sigh of relief. But then, panic sets in. You look at your screen and wonder: Where did that video just go?
It is a surprisingly common roadblock. You cannot share a solution if you cannot find the file. Losing a video you just spent ten minutes creating is incredibly frustrating, especially when you are on a tight deadline to send it to a colleague, a student, or a client.
If you are searching your computer trying to figure out where your Mac hides its screen captures, do not worry. Here is the straightforward guide to finding your missing videos, how to change where they are saved, and how to make sure those files are actually worth sharing once you find them.

The Default Hiding Spot
Apple likes to keep things simple, but sometimes that simplicity causes clutter. By default, macOS sends every single screen recording directly to your Desktop.
If you just clicked stop, minimize all your open windows and look at your desktop background.
- You are looking for a video file ending in .mov.
- The Mac automatically names the file using the date and time. It will look something like this: Screen Recording 2026-06-15 at 10.45 AM.mov.
If your desktop is highly unorganized and filled with hundreds of icons, finding this newly created file can feel like finding a needle in a haystack. You can always open your Finder, click on Desktop in the left sidebar, and sort the files by "Date Added" to bring your new video right to the top.
How to Change the Save Location
You do not have to let your Mac dump every video onto your desktop. You can easily tell your computer exactly where you want future screen recordings to go. Setting up a dedicated folder keeps your workspace clean and removes the stress of hunting for files.
Here is the quick recipe to change your default save location:
- Open the Capture Menu: Press Command + Shift + 5 on your keyboard to open the screen recording toolbar.
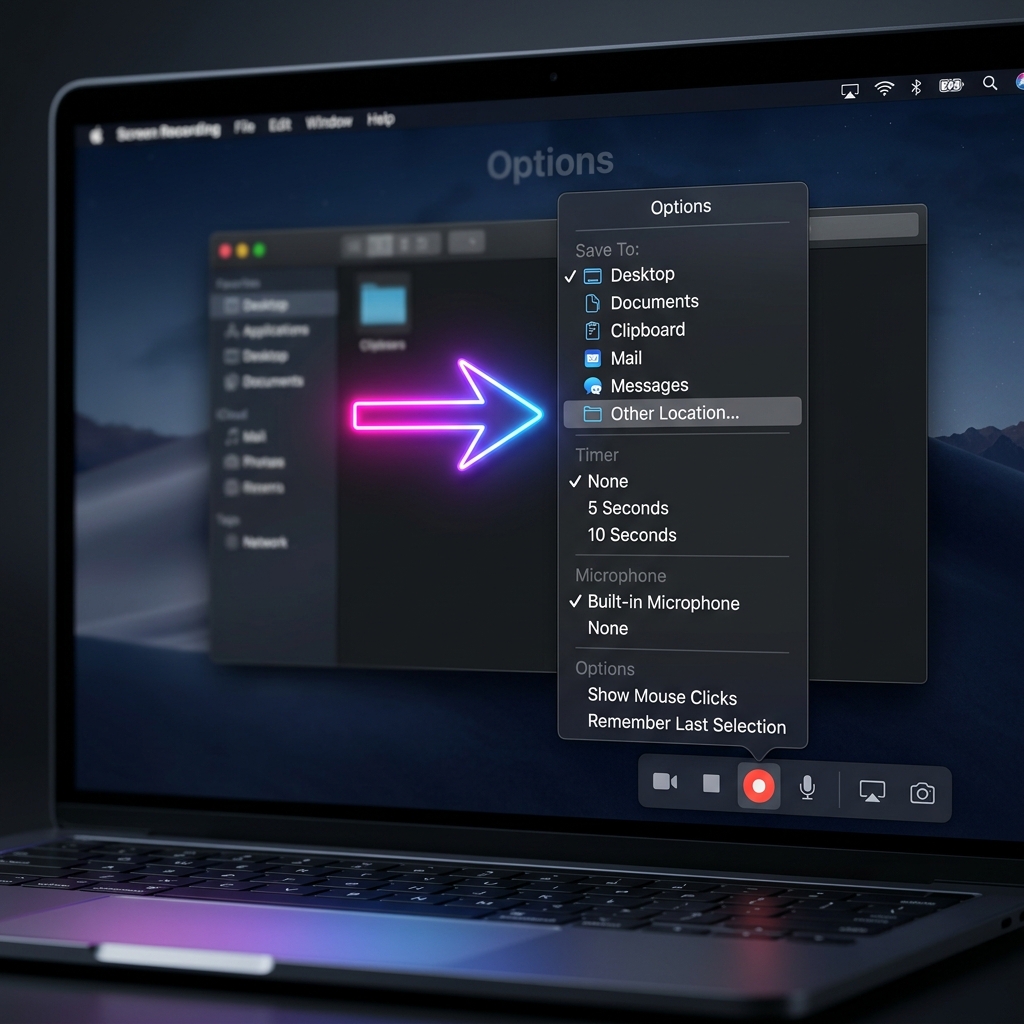
- Open Options: Click on the Options menu on that toolbar.
- Choose Your Destination: At the very top of the menu, under the "Save to" section, you will see options like Desktop, Documents, or Downloads.
- Pick a Custom Folder: To be truly organized, click Other Location... and create a brand new folder called "My Screen Recordings."
Now, every time you finish a video, it will quietly save itself exactly where you told it to.
Recordings Made With QuickTime Save Somewhere Else
The Desktop default only applies to recordings made with the Command + Shift + 5 toolbar. If you recorded using QuickTime Player instead (File → New Screen Recording), nothing is saved automatically. QuickTime opens the finished clip in a window and waits for you to choose File → Save and pick a folder yourself. If you closed that window without saving, the clip may be gone, though QuickTime sometimes keeps an unsaved copy buried in ~/Library/Containers/com.apple.QuickTimePlayerX.
Enjoying this read?
Get weekly insights on video editing, AI workflows, and creator growth straight to your inbox.
Three Fast Ways to Hunt Down a Missing Clip
- Spotlight by file type. Press Command + Space and type
kind:movieto list every video on your Mac. Sort by date and your newest recording rises to the top. - Finder's "Recents." Open Finder and click Recents in the sidebar; a brand-new recording will be sitting right at the top of the list.
- Search by date. In any Finder window, run a search, then add the filter Created date → Today to surface only the files you made in this session.
One iCloud Gotcha Worth Knowing
If you have iCloud Drive's "Desktop & Documents Folders" option turned on, your recordings still land on the Desktop, but they are also uploaded to iCloud. On a slow connection, a large .mov may show a little cloud-download icon and refuse to open until it finishes syncing back down. If a recording will not play, give it a moment to download, or move it to a local folder outside iCloud first.
You Found the File. But Is It Ready to Share?
Locating your screen recording on your Mac is a relief. But when you double-click that file to watch it back, you might notice a new problem.
Standard Mac screen recordings capture everything exactly as it is. On a high-resolution screen, your text and menus probably look microscopic. If your viewer watches this video on their mobile phone, they will have to squint just to see what you are clicking. Add in the fast, jittery movements of a standard trackpad cursor, and your helpful tutorial suddenly becomes confusing and exhausting to watch.
Finding your video is only the first step. Providing a video that gives the viewer visual clarity and a real-life solution is the ultimate goal.
The Secret to Flawless Files
Instead of finding your raw video file and then spending hours dragging it into editing software to fix the zoom and smooth out the mouse movements, you can use a tool that creates a perfect file from the very beginning.
This is the exact problem Cubix Capture solves. It is a screen recorder built to make your content human-friendly and effortlessly professional. When you find a video file created by Cubix Capture, it is already a polished masterpiece:
- Auto-Zoom: It has already intelligently zoomed in on your important actions, meaning the file is instantly ready to be viewed on any device without the viewer struggling to read small text.
- Smooth Cursor: The erratic, nervous mouse movements are automatically replaced with a calm, smooth glide, making the video incredibly easy to follow.
- Live Backgrounds: If your webcam was on, your messy room is already replaced with a clean, distraction-free background.
Stop hunting for lost files on a cluttered desktop, and stop settling for hard-to-read videos. Take control of where your Mac saves your recordings, and use the right tools to ensure every file you open is clear, engaging, and ready to share with the world.
Related reading:
- How to Stop Screen Recording on Mac
- How to Screen Record on Mac: All Methods for 2026
- Mac Screen Recording Has No Sound? How to Fix It
- Change the Save Folder & Recover a Lost Mac Recording
Don’t miss the next one.
Join our newsletter for exclusive tips, product updates, and the latest from the Cubix team.