You're mid-project on your Dell — an XPS, Inspiron, or Latitude — and you need to grab a digital receipt, capture an error for IT, or pull an image into a slide. You press the key marked PrtScn, look up… and nothing visibly happens.
Here's the reassuring part: the problem is almost never Windows. A Dell runs the exact same built-in capture tools as any other PC. What trips people up is Dell's keyboard — to fit full-size keys into thin chassis, Dell doubles up functions on single keys, so Print Screen sometimes needs a partner key to fire.
Sort out two things — where your Print Screen key lives and whether you need the Fn key — and screenshots become instant. Let's nail both, then run every method. (This pairs with our deeper how to capture a screenshot on Windows guide, which explains the tools themselves in full.)
Step 1: Locate the Print Screen Key on Your Dell
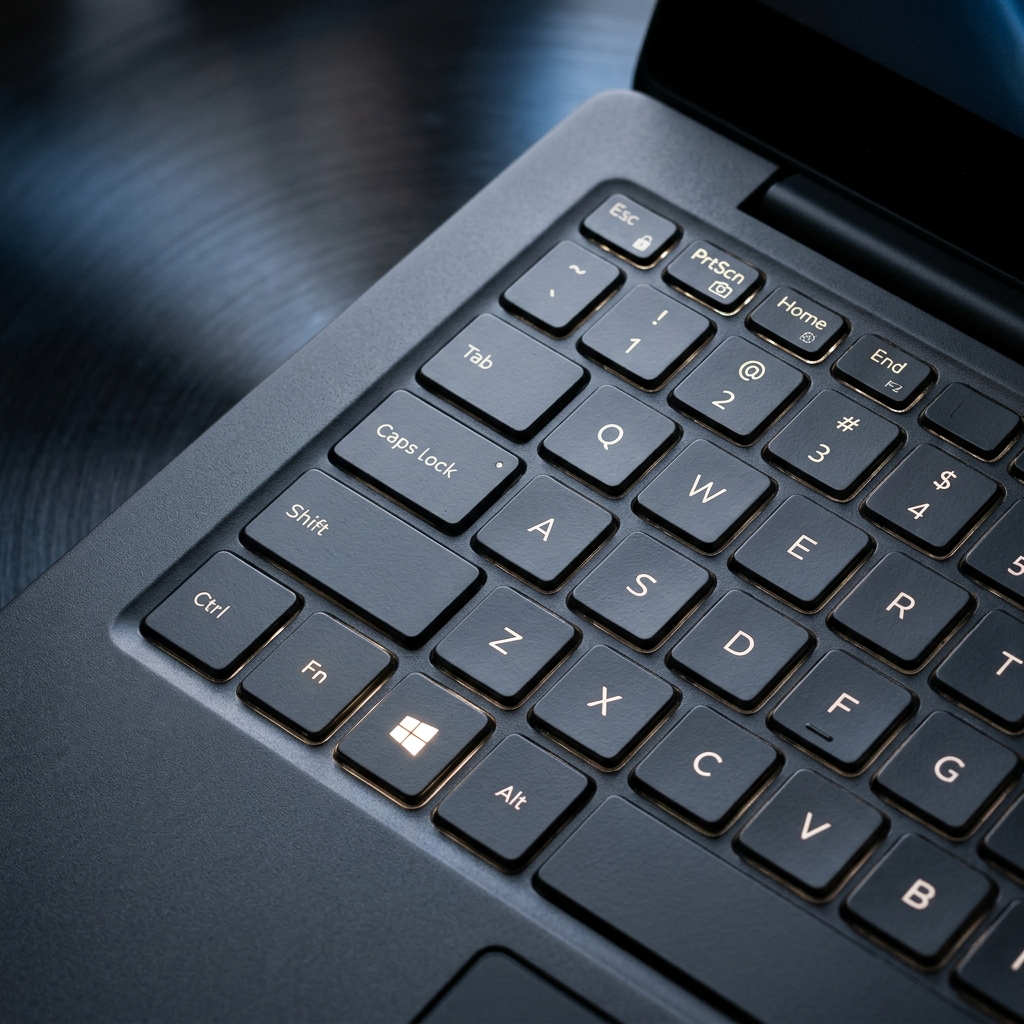
On most Dell keyboards, PrtScn (sometimes printed "Prt Scr") sits in the top-right cluster, often near the Delete key or sharing space with Insert. On compact XPS models, Dell occasionally tucks it into the function row. Spot it now — every shortcut below builds on it.
Step 2: The Dell Fn Lock Trick
This is the single fix for "my Print Screen does nothing." Dell laptops ship with the top-row keys set to media controls (brightness, volume) by default, so a tap on PrtScn may be doing nothing useful.
- Press Fn + Esc once to toggle Fn Lock. This flips the top row between media keys and their "real" F-key / Print Screen behavior — look for a small lock icon on the Esc key to confirm it's on.
- Alternatively, just hold Fn alongside any shortcut below. If a combo seems dead, adding Fn almost always revives it.
The Method to Learn First: Windows + Shift + S
If you memorize one shortcut on your Dell, make it this — it skips the old "paste a giant image into Paint" routine entirely.
- Press Windows + Shift + S together. The screen dims and a slim toolbar appears up top.
- Pick a mode: drag a rectangle, draw a freeform shape, grab a single window, or take the full screen.
- Your snip copies straight to the clipboard — hit Ctrl + V to drop it into Outlook, Teams, Slack, or Word.
A notification slides in afterward; click it to open the editor, where you can annotate or use Text Actions to lift text out of the image. (That OCR feature is a Windows 11 perk — more on it in our Windows 11 screen capture guide.)
Save a Full-Screen Shot as a File: Windows + PrtScn
When you want the whole screen saved instantly with zero clipboard fuss, press Windows + PrtScn (add Fn if your model needs it). The display dims for a beat and a PNG drops into Pictures → Screenshots automatically.
Enjoying this read?
Get weekly insights on video editing, AI workflows, and creator growth straight to your inbox.
Grab Just One Window: Alt + PrtScn
Click the window you care about so it's in focus, then press Alt + PrtScn (or Alt + Fn + PrtScn). Windows copies a clean image of only that app — no wallpaper, no taskbar — ready to paste.
The Bare Print Screen Key
Tapping PrtScn on its own does one of two things depending on your settings: it either opens the Windows + Shift + S snip toolbar, or silently copies the entire screen to your clipboard (no flash, no sound) for you to paste with Ctrl + V. You can choose which under Settings → Accessibility → Keyboard.
Where Do Dell Screenshots Save?
Clipboard captures live nowhere until you paste them. Auto-saved shots (Windows + PrtScn) land in Pictures → Screenshots, and if OneDrive backup is on, they may sync to OneDrive → Pictures → Screenshots instead — check there if a file seems to vanish. On the same hardware? Our companion guides cover HP laptops and Lenovo laptops, and the any-device cheat sheet maps every platform.
Going Beyond the Static Image
A flawless screenshot is essential for quick notes. But when one image can't tell the whole story, things get tedious fast.
If you find yourself stacking five screenshots, scribbling red arrows, and typing paragraphs just to explain a bug or a workflow, you're burning time — and the result still isn't clear. (Here's when to reach for video instead: screen recording vs. screen capture.)
When you're ready to graduate from static images and raw recordings to breathtaking, auto-zoomed, cinematic walkthroughs — with no video editor in sight — explore Cubix Capture.
Don’t miss the next one.
Join our newsletter for exclusive tips, product updates, and the latest from the Cubix team.