
You’ve set up your video capture perfectly, your scenes are beautifully framed, and you hit record. But when you look at the audio mixer panel, the green volume bars for your Desktop Audio are completely dead. They aren't moving a single millimeter, even though you can hear your video game, music, or browser tabs playing perfectly through your headphones.
When OBS Studio fails to capture your desktop audio, it is almost never a catastrophic software bug. Instead, it is a virtual routing disconnect. Because OBS works as a standalone digital audio mixer, it requires a direct hardware or operating system handshake to copy sound waves. If your default output devices shift, or if app permissions lock down, OBS drops into absolute silence.
Whether you are on Windows 11 or macOS, here is the complete diagnostic checklist to unmute your desktop audio instantly.
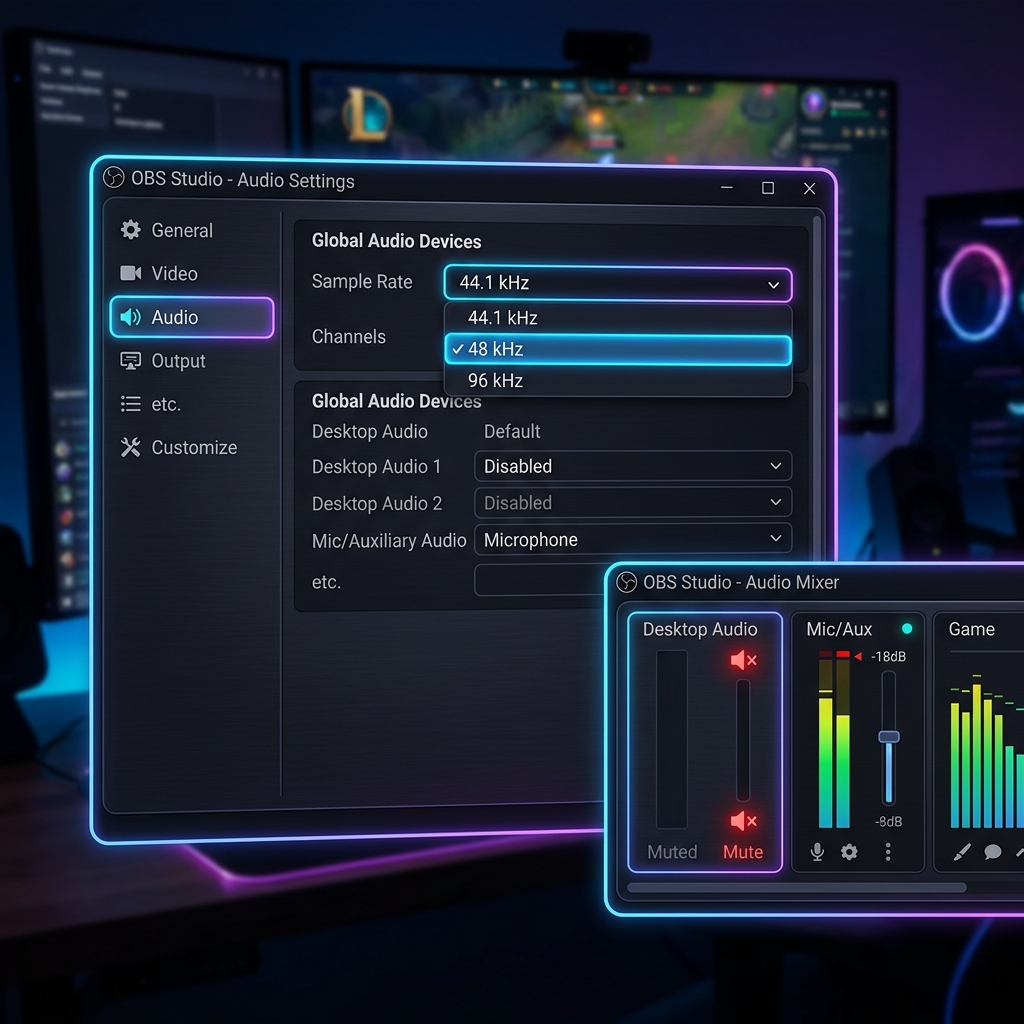
Step 1: Fix the Sample Rate Mismatch (The Hidden Culprit)
This is the number one technical mismatch that leaves creators scratching their heads. Your operating system sound card handles audio at a specific frequency (usually 44.1 kHz or 48 kHz). If OBS is configured to look for a different frequency than your headphones or speakers are outputting, the data stream chokes and outputs zero sound.
-
Check Your Windows Sound Control Panel: Identify your system's core audio frequency. Press the Windows Key, type Change system sounds, and hit Enter. Head to the Playback tab, right-click your active headphones or speakers, select Properties, and open the Advanced tab. Look closely at the default format frequency (e.g.,
24-bit, 48000 Hz). -
Open Your OBS Audio Preferences: Align your broadcasting mixer to match hardware. Launch OBS Studio, click on Settings in the bottom-right corner, and select the Audio tab from the left sidebar.
-
Synchronize the Sample Rates: Match the encoding clock rates precisely. Locate the Sample Rate dropdown at the very top of the panel. If your Windows hardware panel said 48000 Hz, switch OBS to 48 kHz. If your hardware said 44100 Hz, switch OBS to 44.1 kHz.
-
Apply Changes and Restart: Lock in your new sound routing kernel. Click Apply, click OK, and restart OBS Studio completely. Play a video or song on your computer; in many cases, your audio mixer bars will instantly spring back to life.
Step 2: Stop Using "Default" Device Routing
By default, OBS sets its audio capture tracks to a setting called Default. This tells OBS to automatically mirror whatever device Windows is using. However, if you plug in a USB microphone, turn on Bluetooth headphones, or plug in an external monitor, Windows often splits your audio tracks across multiple channels behind the scenes, causing OBS to lose the trail.
- The Fix: Inside your OBS Audio Settings tab, look under the Global Audio Devices section.
- Change Desktop Audio from Default to the exact name of the device you are listening through (e.g., Headphones - Realtek Audio or Speakers - Focusrite USB). Avoid selecting your monitor's internal speakers unless you are actually listening out of them.
Step 3: Unmute OBS in the Windows Volume Mixer
Sometimes, the block isn't inside OBS at all—Windows has simply muted the application on an operating system level.
- Right-click the Speaker Icon in the bottom-right corner of your Windows taskbar and select Open volume mixer.
- Scroll down through the list of running applications until you locate OBS Studio.
- Ensure the volume slider for OBS is pushed up to 100% and make sure the tiny speaker icon next to it does not have a red "muted" symbol over it.
Enjoying this read?
Get weekly insights on video editing, AI workflows, and creator growth straight to your inbox.
Step 4: Install the Application Audio Capture Source
If you are running an updated version of OBS Studio on Windows 10 or 11, the traditional "Global Desktop Audio" pipeline is occasionally bypassed by modern secure apps. You can use OBS's modernized sub-routing tool to pull audio directly from individual programs.
- Go to your Sources box at the bottom of the screen, click the + (Add) icon, and select Application Audio Capture (BETA).
- Name the source after the app you want to hear (e.g., Discord Sound or Chrome Audio).
- In the properties box, choose the specific application window from the dropdown list. This completely avoids global audio bugs by pulling the sound directly from that single app's memory thread.
Step 5: The Desktop Audio Block on Mac (macOS Guide)
If you are a Mac user, you will notice that OBS cannot record Desktop Audio out of the box. This is an intentional security design by Apple; macOS blocks third-party applications from scraping internal system audio lines to prevent secure data leaks.
- The Modern Fix: You no longer need clunky third-party plugins like Loopback or iShowU. Ensure your Mac is updated, open OBS, add a new source, and select macOS Screen Capture.
- Set the capture method to ScreenCaptureKit and ensure Capture Audio is checked in its properties. This leverages Apple's native, low-latency framework to securely feed both your desktop screen and its companion audio straight into OBS without permission errors.
Tired of Sound Check Anxiety? Upgrade to Cubix Capture
While OBS Studio remains an incredible open-source console for live broadcasters and streaming engineers who need advanced multi-track hardware separation, dealing with sample rate math, device priority swaps, and constant unmuting fixes can derail your workflow.
If your primary objective is simply producing crisp software tutorials, web walkthroughs, onboarding modules, or digital course lessons without spending your afternoons acting as an audio support technician, it is time to move your stack to Cubix Capture.
Instead of running like a complex hardware mixing console that drops audio feeds under minor device switches, Cubix Capture uses a modernized, zero-configuration capture engine:
- Unified Audio Routing: It completely bypasses sample rate mismatches. It automatically locks onto your active desktop application sounds and microphone lines simultaneously with zero manual device assignment loops.
- Algorithmic Focal Zooming: Because over half of your audience watches tutorials on smartphones, full-screen captures make user interface layout labels look microscopic. Cubix Capture automatically tracks your cursor targets and smoothly glides the camera inward to magnify dropdown menus, text blocks, and settings panels dynamically while you talk.
- AI Cursor Path Smoothing: It catches naturally frantic or jittery micro-movements from your physical trackpad or mouse and translates them into an elegant, fluid visual sweep that calmly leads your viewer's focus.
If you are managing an elaborate live-stream broadcast with dual PCs and external mixing boards, syncing your sample rates to 48 kHz inside your Windows Sound Panel will restore your OBS desktop audio layer. But if you want to safeguard your schedule, eliminate technical troubleshooting, and output polished, mobile-optimized tutorials the exact millisecond you click stop recording, moving your creator setup to a smart tool like Cubix Capture handles the entire pipeline for you seamlessly.
Keep Reading
- OBS Desktop Audio Not Working Windows 11
- OBS Microphone Not Working - Fix It in 5 Minutes
- OBS Shows Black Screen But Audio Works: Fix
- My Screen Recording Has No Audio - How to Fix It (Mac & Windows)
- How to Capture System Audio on Mac Without Installing Drivers
Don’t miss the next one.
Join our newsletter for exclusive tips, product updates, and the latest from the Cubix team.